HP LH4r HP Netserver LXr 8000 to LXr 8500 Upgrade Guide - Page 75
Finishing the Assembly
 |
View all HP LH4r manuals
Add to My Manuals
Save this manual to your list of manuals |
Page 75 highlights
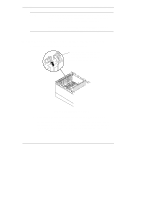
7 Finishing the Assembly Now that you know the NetServer LXr 8500 boots, you can finish the assembly. This chapter provides instructions on: l Adding the remaining processors l Installing accessory boards on the I/O baseboard l Installing the top cover and bezel. NOTE If you removed the NetServer from the rack, see the HP NetServer LXr 8500 Installation Guide for instructions on reinstalling it in the rack. Add Remaining Processors CAUTION Be sure the NetServer power is off and the power cord is disconnected before you proceed with the instructions in this chapter. 1. Open the processor cage cover on the LXr 8500. 2. Remove each remaining processor module from the LXr 8000 and insert it into the LXr 8500 as follows: a. From the front of the NetServer LXr 8500, locate the left processor cage. b. Starting with the leftmost terminator in the left processor cage, remove one terminator for each processor you plan to install into the LXr 8500. c. Remove each processor module from the LXr 8000 and turn it 180o before inserting it into the LXr 8500. d. Make sure that the retaining latches on top of the processor module are open (pointing straight up). Slide the processor module into the leftmost open slot in the processor cage, and rotate the retaining latches into the closed position. e. Fully install processor modules on the left processor cage before installing and using the right processor cage. The left processor cage must be fully loaded with four processor modules before you install 69
-
 1
1 -
2
-
3
-
4
-
5
-
6
-
7
-
8
-
9
-
10
-
11
-
12
-
13
-
14
-
15
-
16
-
17
-
18
-
19
-
20
-
21
-
22
-
23
-
24
-
25
-
26
-
27
-
28
-
29
-
30
-
31
-
32
-
33
-
34
-
35
-
36
-
37
-
38
-
39
-
40
-
41
-
42
-
43
-
44
-
45
-
46
-
47
-
48
-
49
-
50
-
51
-
52
-
53
-
54
-
55
-
56
-
57
-
58
-
59
-
60
-
61
-
62
-
63
-
64
-
65
-
66
-
67
-
68
-
69
-
 70
70 -
 71
71 -
 72
72 -
 73
73 -
 74
74 -
 75
75 -
 76
76 -
 77
77 -
 78
78 -
 79
79 -
 80
80 -
81
-
82
-
83
-
84
-
85
-
86
-
87
-
88
-
89
-
90
-
91
-
92
-
93
-
94
-
95
-
96
-
97
 |
 |
