HP LaserJet 3392 HP LaserJet 3050/3052/3055/3390/3392 All-in-One - Software Te - Page 145
Printer Memory, Include Types in Application Source List selection, Printer image - printer cartridge
 |
View all HP LaserJet 3392 manuals
Add to My Manuals
Save this manual to your list of manuals |
Page 145 highlights
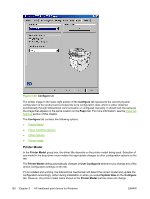
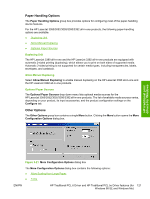
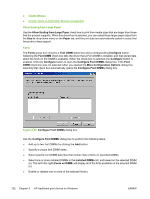
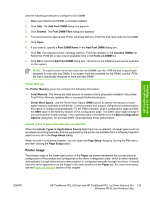
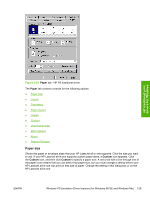
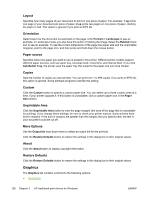
HP traditional print drivers for Windows Use the following procedure to configure a font DIMM: 1. Make sure that the font DIMM is correctly installed. 2. Click Add. The Add Font DIMM dialog box appears. 3. Click Browse. The Font DIMM Files dialog box appears. 4. Find and select the appropriate Printer Cartridge Metrics (.PCM) file that came with the font DIMM. 5. Click Open. 6. If you want to, specify a Font DIMM Name in the Add Font DIMM dialog box. 7. Click OK. The selected printer cartridge metrics (.PCM) file appears in the Installed DIMMs list. Select the .PCM file to see a list of available fonts in the Fonts on DIMM list. 8. Click OK to close the Add Font DIMM dialog box. The fonts on the DIMM should now be available on the system. NOTE To install screen fonts that match the font DIMM, use the .HPB file that is specifically designed to work with that DIMM. If no screen fonts are available for the DIMM, use the .PCM file that is specifically designed to work with that DIMM. Printer Memory The Printer Memory group box contains the following information: ● Total Memory. This shows the total amount of memory that is physically installed in the printer. Total Printer Memory updates after a successful bidirectional query. ● Driver Work Space. Use the Driver Work Space (DWS) option to specify the amount of work- space memory available to the printer. In environments that support bidirectional communication, this option is configured automatically. To set DWS manually, print a configuration page and find the DWS value in the Memory section of the configuration page. The DWS value might change if you switch printer-model settings. Then, type that value in the DWS box in the More Configuration Options dialog box. An accurate DWS value optimizes driver performance. Include Types in Application Source List selection When the Include Types in Applications Source List check box is selected, all paper types (such as envelopes and transparencies) that are supported by the printer are available from a software program's paper source list in the Page Setup dialog. When you are in a software program, you can open the Page Setup dialog by clicking the File menu, and then clicking the Page Setup button. Printer image The bitmap image in the lower-right portion of the Paper tab screen represents the current physical configuration of the product and corresponds to the driver configuration data, which is either obtained automatically through bidirectional communication or configured manually through the driver. It should have the same appearance as the image in the same location on the Paper tab. For more information, see the Paper tab features section of this chapter. ENWW HP Traditional PCL 6 Driver and HP Traditional PCL 5e Driver features (for 123 Windows 98 SE and Windows Me)
-
 1
1 -
2
-
3
-
4
-
5
-
6
-
7
-
8
-
9
-
10
-
11
-
12
-
13
-
14
-
15
-
16
-
17
-
18
-
19
-
20
-
21
-
22
-
23
-
24
-
25
-
26
-
27
-
28
-
29
-
30
-
31
-
32
-
33
-
34
-
35
-
36
-
37
-
38
-
39
-
40
-
41
-
42
-
43
-
44
-
45
-
46
-
47
-
48
-
49
-
50
-
51
-
52
-
53
-
54
-
55
-
56
-
57
-
58
-
59
-
60
-
61
-
62
-
63
-
64
-
65
-
66
-
67
-
68
-
69
-
70
-
71
-
72
-
73
-
74
-
75
-
76
-
77
-
78
-
79
-
80
-
81
-
82
-
83
-
84
-
85
-
86
-
87
-
88
-
89
-
90
-
91
-
92
-
93
-
94
-
95
-
96
-
97
-
98
-
99
-
100
-
101
-
102
-
103
-
104
-
105
-
106
-
107
-
108
-
109
-
110
-
111
-
112
-
113
-
114
-
115
-
116
-
117
-
118
-
119
-
120
-
121
-
122
-
123
-
124
-
125
-
126
-
127
-
128
-
129
-
130
-
131
-
132
-
133
-
134
-
135
-
136
-
137
-
138
-
139
-
 140
140 -
 141
141 -
 142
142 -
 143
143 -
 144
144 -
 145
145 -
 146
146 -
 147
147 -
 148
148 -
 149
149 -
 150
150 -
151
-
152
-
153
-
154
-
155
-
156
-
157
-
158
-
159
-
160
-
161
-
162
-
163
-
164
-
165
-
166
-
167
-
168
-
169
-
170
-
171
-
172
-
173
-
174
-
175
-
176
-
177
-
178
-
179
-
180
-
181
-
182
-
183
-
184
-
185
-
186
-
187
-
188
-
189
-
190
-
191
-
192
-
193
-
194
-
195
-
196
-
197
-
198
-
199
-
200
-
201
-
202
-
203
-
204
-
205
-
206
-
207
-
208
-
209
-
210
-
211
-
212
-
213
-
214
-
215
-
216
-
217
-
218
-
219
-
220
-
221
-
222
-
223
-
224
-
225
-
226
-
227
-
228
-
229
-
230
-
231
-
232
-
233
-
234
-
235
-
236
-
237
-
238
-
239
-
240
-
241
-
242
-
243
-
244
-
245
-
246
-
247
-
248
-
249
-
250
-
251
-
252
-
253
-
254
-
255
-
256
-
257
-
258
-
259
-
260
-
261
-
262
-
263
-
264
-
265
-
266
-
267
-
268
-
269
-
270
-
271
-
272
-
273
-
274
-
275
-
276
-
277
-
278
-
279
-
280
-
281
-
282
-
283
-
284
-
285
-
286
-
287
-
288
-
289
-
290
-
291
-
292
-
293
-
294
-
295
-
296
-
297
-
298
-
299
-
300
-
301
-
302
-
303
-
304
-
305
-
306
-
307
-
308
-
309
-
310
-
311
-
312
-
313
-
314
-
315
-
316
-
317
-
318
-
319
-
320
-
321
-
322
-
323
-
324
-
325
-
326
-
327
-
328
-
329
-
330
-
331
-
332
-
333
-
334
-
335
-
336
-
337
-
338
-
339
-
340
-
341
-
342
-
343
-
344
-
345
-
346
-
347
-
348
-
349
-
350
-
351
-
352
-
353
-
354
-
355
-
356
-
357
-
358
-
359
-
360
-
361
-
362
-
363
-
364
-
365
-
366
-
367
-
368
-
369
-
370
-
371
-
372
-
373
-
374
-
375
-
376
-
377
-
378
-
379
-
380
 |
 |
