HP LaserJet 5L HP LaserJet 5L - Printer User's Manual - Page 78
Installing Memory Cards DRAM
 |
View all HP LaserJet 5L manuals
Add to My Manuals
Save this manual to your list of manuals |
Page 78 highlights
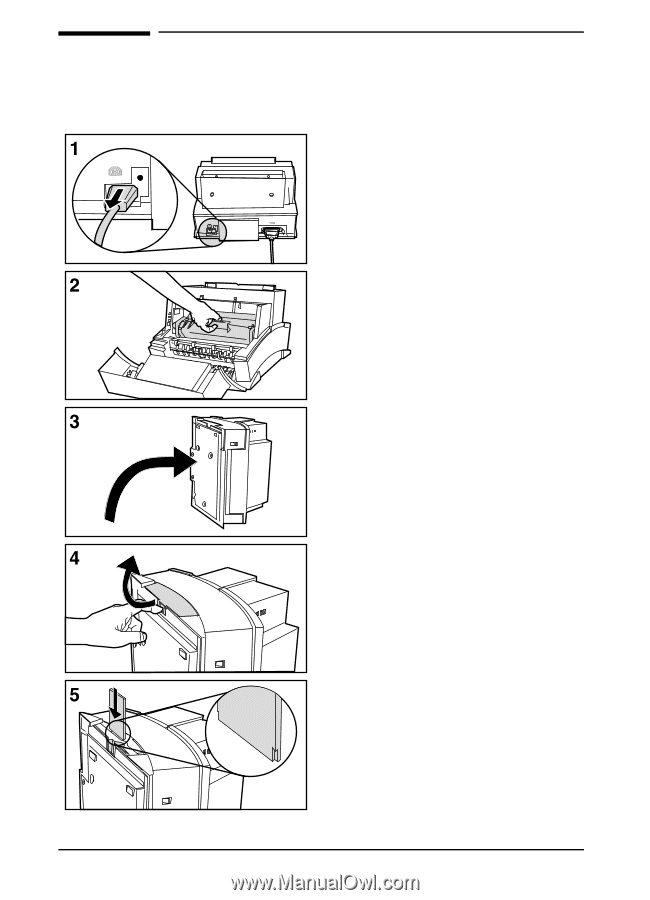
Installing Memory Cards (DRAM) 1 Unplug the power cord from the printer. You should not install a memory card while the printer is in SleepMode. 2 Open the Printer Door, remove the toner cartridge, and close the Printer Door. Protect the toner cartridge from light while you are working on the printer. 3 Remove any paper in the paper tray. Gently tip the printer onto its side so that the memory cover is on top as shown in Figure 3. 4 Remove the Memory Expansion Cover by placing a finger through the hole and pulling away from the printer. 5 Align the memory card with the corner notch so it is positioned as in Figure 4. Push it firmly into the printer. Replace the Memory Expansion Cover, set the printer upright, reinstall the toner cartridge, reinsert paper, and reconnect to the power source. Print a self test page (see Chapter 6) to check that the printer recognizes the additional memory you have added. Your Total Memory in the "Printer Information" section will show the new MB total. 1 MByte card 2 MByte total 2 MByte card 3 MByte total 4 MByte card 5 MByte total 8 MByte card 9 MByte total D-2 Memory Installation (DRAM) EN
-
 1
1 -
2
-
3
-
4
-
5
-
6
-
7
-
8
-
9
-
10
-
11
-
12
-
13
-
14
-
15
-
16
-
17
-
18
-
19
-
20
-
21
-
22
-
23
-
24
-
25
-
26
-
27
-
28
-
29
-
30
-
31
-
32
-
33
-
34
-
35
-
36
-
37
-
38
-
39
-
40
-
41
-
42
-
43
-
44
-
45
-
46
-
47
-
48
-
49
-
50
-
51
-
52
-
53
-
54
-
55
-
56
-
57
-
58
-
59
-
60
-
61
-
62
-
63
-
64
-
65
-
66
-
67
-
68
-
69
-
70
-
71
-
72
-
 73
73 -
 74
74 -
 75
75 -
 76
76 -
 77
77 -
 78
78 -
 79
79 -
 80
80 -
 81
81 -
 82
82 -
 83
83 -
84
-
85
-
86
 |
 |