HP LaserJet Enterprise M406 LaserJet Enterprise M406 M407 User Guide - Page 76
Security tab
 |
View all HP LaserJet Enterprise M406 manuals
Add to My Manuals
Save this manual to your list of manuals |
Page 76 highlights
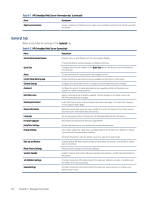
Table 5-6 HP Embedded Web Server Troubleshooting tab Menu Description General Troubleshooting Use the following options as appropriate: ● Reports and Tests area: Select and print several types of reports and tests. Some reports can be viewed in the EWS by clicking the View button. ● Fax Tools area: Configure settings for fax troubleshooting. (MFP and Digital Sender products with HP analog fax accessory only) ● OXPd Troubleshooting area: Enable or disable the Allow a Non-Secure Connection for Web Services option ● Auto Recovery area: Enable or disable the Enable Auto Recovery option, which allows the printer to auto recover from errors that might require the power to be turned off and on (for example, a 49 error). Online Help Link to HP cloud-based online help to assist in troubleshooting printing issues. Diagnostic Data NOTE: This item is available only if an administrator password is set from the Security tab. Export printer information to a file that can be useful for HP technical support to use for detailed problem analysis. Calibration/Cleaning (Color LaserJet printers only) Enable the automatic cleaning feature, create and print the cleaning page, and select an option to calibrate the printer immediately. Reset Factory Settings Restore printer settings to factory defaults. Firmware Upgrade Download and install printer firmware upgrade files. Security tab Refer to the table for settings in the Security tab. Table 5-7 HP Embedded Web Server Security tab Menu Description General Security Settings for general security, including the following: ● Configure an administrator password to restrict access to certain features on the printer. ● Set a custom device Service Access Code. ● Set PJL password for processing PJL commands. ● Set file system access and firmware upgrade security. ● Enable or disable the Host USB port on the control panel or the USB connectivity port on the formatter for printing directly from a computer. Account Policy Access Control Protect Stored Data ● View the status of all security settings. Enable administrator account settings. Configure access to printer functions for specific individuals or groups, and select the method individuals use to sign in to the printer. Configure and manage the internal storage for the printer. Configure settings for jobs that are stored on the printer internal storage. 66 Chapter 5 Manage the printer
-
 1
1 -
2
-
3
-
4
-
5
-
6
-
7
-
8
-
9
-
10
-
11
-
12
-
13
-
14
-
15
-
16
-
17
-
18
-
19
-
20
-
21
-
22
-
23
-
24
-
25
-
26
-
27
-
28
-
29
-
30
-
31
-
32
-
33
-
34
-
35
-
36
-
37
-
38
-
39
-
40
-
41
-
42
-
43
-
44
-
45
-
46
-
47
-
48
-
49
-
50
-
51
-
52
-
53
-
54
-
55
-
56
-
57
-
58
-
59
-
60
-
61
-
62
-
63
-
64
-
65
-
66
-
67
-
68
-
69
-
70
-
 71
71 -
 72
72 -
 73
73 -
 74
74 -
 75
75 -
 76
76 -
 77
77 -
 78
78 -
 79
79 -
 80
80 -
 81
81 -
82
-
83
-
84
-
85
-
86
-
87
-
88
-
89
-
90
-
91
-
92
-
93
-
94
-
95
-
96
-
97
-
98
-
99
-
100
-
101
-
102
-
103
-
104
-
105
-
106
-
107
-
108
-
109
-
110
-
111
-
112
-
113
-
114
-
115
-
116
-
117
-
118
-
119
-
120
-
121
-
122
-
123
-
124
-
125
-
126
-
127
-
128
-
129
-
130
-
131
-
132
-
133
-
134
-
135
-
136
-
137
-
138
-
139
-
140
-
141
-
142
-
143
-
144
-
145
-
146
-
147
-
148
-
149
-
150
-
151
-
152
-
153
-
154
-
155
-
156
-
157
-
158
-
159
-
160
-
161
-
162
-
163
-
164
-
165
-
166
-
167
-
168
-
169
-
170
-
171
-
172
-
173
-
174
-
175
-
176
-
177
-
178
 |
 |