HP LaserJet P4015 HP LaserJet P4010 and P4510 Series - Software Technical Refe - Page 267
Remote firmware update by using FTP through a browser
 |
View all HP LaserJet P4015 manuals
Add to My Manuals
Save this manual to your list of manuals |
Page 267 highlights
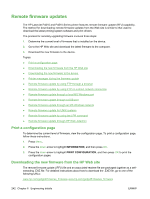
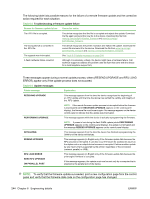
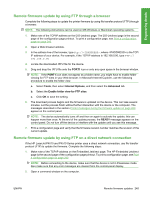
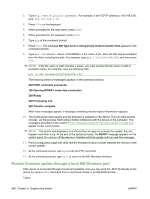
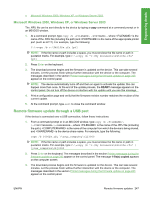
Engineering details Remote firmware update by using FTP through a browser Complete the following steps to update the printer firmware by using file transfer protocol (FTP) through a browser. NOTE: The following instructions can be used on MS Windows or Macintosh operating systems. 1. Make note of the TCP/IP address on the EIO-Jetdirect page. The EIO-Jetdirect page is the second page of the configuration page printout. To print a configuration page, see Print a configuration page on page 242 2. Open a Web browser window. 3. In the address line of the browser, type ftp://, where is the TCP/ IP address of your device. For example, if the TCP/IP address is 192.168.0.90, type FTP:// 192.168.0.90 4. Locate the downloaded .RFU file for the device. 5. Drag and drop the .RFU file onto the PORT1 icon or onto any open space in the browser window. NOTE: If the PORT1 icon does not appear as a folder name, you might have to enable folder viewing for FTP sites in your Web browser. In Microsoft Internet Explorer, use the following procedure to enable the folder view. a. Select Tools, then select Internet Options, and then select the Advanced tab. b. Select the Enable folder view for FTP sites. c. Click OK to save the setting. 6. The download process begins and the firmware is updated on the device. This can take several minutes. Let the process finish without further interaction with the device or the computer. The messages described in the section Printer messages during the firmware update on page 243 appear on the control panel. NOTE: The device automatically turns off and then on again to activate the update; this can happen more than once. At the end of the update process, the READY message appears on the control panel. Do not turn off the device or interfere with the update until you see this message. 7. Print a configuration page and verify that the firmware revision number matches the revision of the current update. Remote firmware update by using FTP on a direct network connection If the HP LaserJet P4010 and P4510 Series printer uses a direct network connection, use file transfer protocol (FTP) to update the firmware. Complete the following steps: 1. Make note of the TCP/IP address on the Embedded Jetdirect page. The HP Embedded Jetdirect page is the second page of the configuration page printout. To print a configuration page, see Print a configuration page on page 242 NOTE: Before connecting to the device, make sure that the device is not in Powersave mode. Also make sure that any error messages are cleared from the control-panel display. 2. Open a command window on the computer. ENWW Remote firmware updates 245
-
 1
1 -
2
-
3
-
4
-
5
-
6
-
7
-
8
-
9
-
10
-
11
-
12
-
13
-
14
-
15
-
16
-
17
-
18
-
19
-
20
-
21
-
22
-
23
-
24
-
25
-
26
-
27
-
28
-
29
-
30
-
31
-
32
-
33
-
34
-
35
-
36
-
37
-
38
-
39
-
40
-
41
-
42
-
43
-
44
-
45
-
46
-
47
-
48
-
49
-
50
-
51
-
52
-
53
-
54
-
55
-
56
-
57
-
58
-
59
-
60
-
61
-
62
-
63
-
64
-
65
-
66
-
67
-
68
-
69
-
70
-
71
-
72
-
73
-
74
-
75
-
76
-
77
-
78
-
79
-
80
-
81
-
82
-
83
-
84
-
85
-
86
-
87
-
88
-
89
-
90
-
91
-
92
-
93
-
94
-
95
-
96
-
97
-
98
-
99
-
100
-
101
-
102
-
103
-
104
-
105
-
106
-
107
-
108
-
109
-
110
-
111
-
112
-
113
-
114
-
115
-
116
-
117
-
118
-
119
-
120
-
121
-
122
-
123
-
124
-
125
-
126
-
127
-
128
-
129
-
130
-
131
-
132
-
133
-
134
-
135
-
136
-
137
-
138
-
139
-
140
-
141
-
142
-
143
-
144
-
145
-
146
-
147
-
148
-
149
-
150
-
151
-
152
-
153
-
154
-
155
-
156
-
157
-
158
-
159
-
160
-
161
-
162
-
163
-
164
-
165
-
166
-
167
-
168
-
169
-
170
-
171
-
172
-
173
-
174
-
175
-
176
-
177
-
178
-
179
-
180
-
181
-
182
-
183
-
184
-
185
-
186
-
187
-
188
-
189
-
190
-
191
-
192
-
193
-
194
-
195
-
196
-
197
-
198
-
199
-
200
-
201
-
202
-
203
-
204
-
205
-
206
-
207
-
208
-
209
-
210
-
211
-
212
-
213
-
214
-
215
-
216
-
217
-
218
-
219
-
220
-
221
-
222
-
223
-
224
-
225
-
226
-
227
-
228
-
229
-
230
-
231
-
232
-
233
-
234
-
235
-
236
-
237
-
238
-
239
-
240
-
241
-
242
-
243
-
244
-
245
-
246
-
247
-
248
-
249
-
250
-
251
-
252
-
253
-
254
-
255
-
256
-
257
-
258
-
259
-
260
-
261
-
 262
262 -
 263
263 -
 264
264 -
 265
265 -
 266
266 -
 267
267 -
 268
268 -
 269
269 -
 270
270 -
 271
271 -
 272
272 -
273
-
274
-
275
-
276
-
277
-
278
-
279
-
280
-
281
-
282
-
283
-
284
-
285
-
286
-
287
-
288
-
289
-
290
-
291
-
292
-
293
-
294
-
295
-
296
-
297
-
298
 |
 |
