HP LaserJet P4015 HP LaserJet P4010 and P4510 Series - Software Technical Refe - Page 93
Plug-and-Play Installation for installing print drivers, Point and print installation for Windows - pcl6 driver
 |
View all HP LaserJet P4015 manuals
Add to My Manuals
Save this manual to your list of manuals |
Page 93 highlights
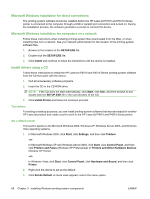
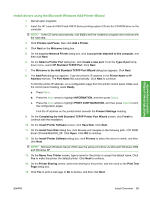
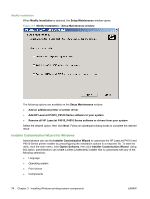
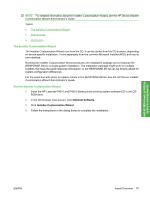
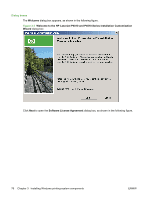
Install Windows printingsystem components prompted by the dialog box to confirm that the HP LaserJet P4010 and P4510 Series printer is connected and running properly. Plug-and-Play Installation for installing print drivers Use this method to install the print drivers on a computer running the MS Windows XP x64 Edition operating system. CAUTION: Do not attach the USB cable to the printer until prompted during the EZInstall program. The HP LaserJet P4010 and P4510 Series printer must be properly set up before starting the Plug-andPlay installation. Follow these instructions to set up the computer: 1. Close all software programs running on the computer. 2. Open your Web browser and go to the following Web site: www.hp.com/go/ ljp4010series_software or www.hp.com/go/ljp4510series_software 3. Click the Download drivers and software. 4. Click to select the model number for the printer driver you want to install. 5. Click to select the operating system you are using. 6. In the Driver section, find the Plug and Play package for the driver you want to install, then click Download. 7. Select Save and a Save As dialog box appears. 8. Select a directory to save the file in and click Save. Write down and remember the location of the saved file. 9. Locate the file using Windows Explorer when the download has completed. 10. Double-click on the file. This extracts all the driver files into a directory on the computer hard-drive. The default directory is: : c:\Program Files\Hewlett-Packard\LaserJet CP1510 Drivers However, the path and directory name can be changed when the file is extracted. 11. Click Next after the file extraction is complete and follow the instructions presented by the EZInstall program. Attach the USB cable only when prompted by the EZInstall program. 12. Delete the file: clj2700-PCL6-pnp-winx64-.exe Point and print installation for Windows Use the following information to install a print driver through the Microsoft Point and Print function when you do not connect directly to the device on the network. Point and Print is a Microsoft term that describes a two-step driver installation process. The first step is to install a shared driver on a network print server. The second step is to "point" to the print server from a network client so that the client can use the print driver. This section outlines the procedures for installing print drivers by using Point and Print. If these procedures are not successful, contact Microsoft. ENWW Install Overview 71
-
 1
1 -
2
-
3
-
4
-
5
-
6
-
7
-
8
-
9
-
10
-
11
-
12
-
13
-
14
-
15
-
16
-
17
-
18
-
19
-
20
-
21
-
22
-
23
-
24
-
25
-
26
-
27
-
28
-
29
-
30
-
31
-
32
-
33
-
34
-
35
-
36
-
37
-
38
-
39
-
40
-
41
-
42
-
43
-
44
-
45
-
46
-
47
-
48
-
49
-
50
-
51
-
52
-
53
-
54
-
55
-
56
-
57
-
58
-
59
-
60
-
61
-
62
-
63
-
64
-
65
-
66
-
67
-
68
-
69
-
70
-
71
-
72
-
73
-
74
-
75
-
76
-
77
-
78
-
79
-
80
-
81
-
82
-
83
-
84
-
85
-
86
-
87
-
 88
88 -
 89
89 -
 90
90 -
 91
91 -
 92
92 -
 93
93 -
 94
94 -
 95
95 -
 96
96 -
 97
97 -
 98
98 -
99
-
100
-
101
-
102
-
103
-
104
-
105
-
106
-
107
-
108
-
109
-
110
-
111
-
112
-
113
-
114
-
115
-
116
-
117
-
118
-
119
-
120
-
121
-
122
-
123
-
124
-
125
-
126
-
127
-
128
-
129
-
130
-
131
-
132
-
133
-
134
-
135
-
136
-
137
-
138
-
139
-
140
-
141
-
142
-
143
-
144
-
145
-
146
-
147
-
148
-
149
-
150
-
151
-
152
-
153
-
154
-
155
-
156
-
157
-
158
-
159
-
160
-
161
-
162
-
163
-
164
-
165
-
166
-
167
-
168
-
169
-
170
-
171
-
172
-
173
-
174
-
175
-
176
-
177
-
178
-
179
-
180
-
181
-
182
-
183
-
184
-
185
-
186
-
187
-
188
-
189
-
190
-
191
-
192
-
193
-
194
-
195
-
196
-
197
-
198
-
199
-
200
-
201
-
202
-
203
-
204
-
205
-
206
-
207
-
208
-
209
-
210
-
211
-
212
-
213
-
214
-
215
-
216
-
217
-
218
-
219
-
220
-
221
-
222
-
223
-
224
-
225
-
226
-
227
-
228
-
229
-
230
-
231
-
232
-
233
-
234
-
235
-
236
-
237
-
238
-
239
-
240
-
241
-
242
-
243
-
244
-
245
-
246
-
247
-
248
-
249
-
250
-
251
-
252
-
253
-
254
-
255
-
256
-
257
-
258
-
259
-
260
-
261
-
262
-
263
-
264
-
265
-
266
-
267
-
268
-
269
-
270
-
271
-
272
-
273
-
274
-
275
-
276
-
277
-
278
-
279
-
280
-
281
-
282
-
283
-
284
-
285
-
286
-
287
-
288
-
289
-
290
-
291
-
292
-
293
-
294
-
295
-
296
-
297
-
298
 |
 |