HP LaserJet Pro 300 HP LaserJet Pro 300 and 400 Color M351 and M451 - Software - Page 178
Create Package, Required Settings
 |
View all HP LaserJet Pro 300 manuals
Add to My Manuals
Save this manual to your list of manuals |
Page 178 highlights
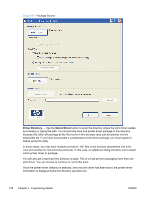
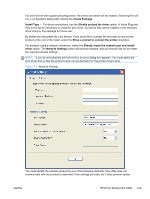
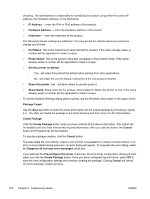
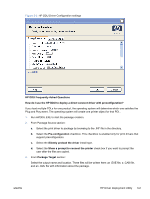
4. From Create Package section: a. If you want to suppress any error messages, select the Suppress all end user error messages check box. b. Click the Create Package button 5. Run the new .EXE file from the client computer. You must have administrator rights to run the .EXE file because it will be copying files into the Windows driver store. Now the printer-driver files are on the system, and any user can connect the product to trigger the Plug and Play event. NOTE: The printer object is not created until the product is connected. NOTE: If you deploy multiple direct connect print drivers, with preconfiguration, and they all use a pre-config file with the same name, the first one connected will be the only one configured properly. This might happen if you deploy the PCL6 and PCL5 print drivers for the same product. The reason is that the config file is copied to the \3 directory awaiting the product being connected. Each deployment will just copy over the same config file since they all use the same name. Once the product is connected, this config file gets consumed and deleted. Future Plug and Play events will not have the config file available. How do I use the HP DDU to deploy a network product with preconfiguration? NOTE: Before running the HP DDU, you must download the driver you want to package, expand the driver, and place the driver in its own directory on the computer where the HP DDU will run. 1. Run HPDDU.EXE to create the package. 2. From Package Source section: a. Select the print driver to package by browsing to the .INF file in the directory. b. Select the Pre-configuration checkbox. This checkbox is enabled only for print drivers that support preconfiguration. c. Select the Silently create network port and install driver install type. d. Click the Network Settings button to enter the network settings. 3. From Network Settings dialog: a. From the Required Settings section, enter at least one way of identifying the product (IP address, Hardware address, or Hostname). b. Make any changes to the Additional Settings section (port name, product name, default printer, sharing and share name). You can leave the default settings if you don't need to make changes. 4. From Package Target section: Select the output name and location. Three files will be written here: an .EXE file, a .CAB file and an .XML file with information about the package. 162 Chapter 5 Engineering details ENWW
-
 1
1 -
2
-
3
-
4
-
5
-
6
-
7
-
8
-
9
-
10
-
11
-
12
-
13
-
14
-
15
-
16
-
17
-
18
-
19
-
20
-
21
-
22
-
23
-
24
-
25
-
26
-
27
-
28
-
29
-
30
-
31
-
32
-
33
-
34
-
35
-
36
-
37
-
38
-
39
-
40
-
41
-
42
-
43
-
44
-
45
-
46
-
47
-
48
-
49
-
50
-
51
-
52
-
53
-
54
-
55
-
56
-
57
-
58
-
59
-
60
-
61
-
62
-
63
-
64
-
65
-
66
-
67
-
68
-
69
-
70
-
71
-
72
-
73
-
74
-
75
-
76
-
77
-
78
-
79
-
80
-
81
-
82
-
83
-
84
-
85
-
86
-
87
-
88
-
89
-
90
-
91
-
92
-
93
-
94
-
95
-
96
-
97
-
98
-
99
-
100
-
101
-
102
-
103
-
104
-
105
-
106
-
107
-
108
-
109
-
110
-
111
-
112
-
113
-
114
-
115
-
116
-
117
-
118
-
119
-
120
-
121
-
122
-
123
-
124
-
125
-
126
-
127
-
128
-
129
-
130
-
131
-
132
-
133
-
134
-
135
-
136
-
137
-
138
-
139
-
140
-
141
-
142
-
143
-
144
-
145
-
146
-
147
-
148
-
149
-
150
-
151
-
152
-
153
-
154
-
155
-
156
-
157
-
158
-
159
-
160
-
161
-
162
-
163
-
164
-
165
-
166
-
167
-
168
-
169
-
170
-
171
-
172
-
 173
173 -
 174
174 -
 175
175 -
 176
176 -
 177
177 -
 178
178 -
 179
179 -
 180
180 -
 181
181 -
 182
182 -
 183
183 -
184
-
185
-
186
-
187
-
188
-
189
-
190
-
191
-
192
-
193
-
194
-
195
-
196
 |
 |