HP Latex 850 Troubleshoot Image Quality issues - Page 6
Blurred or defective areas on edges or lines - service manual
 |
View all HP Latex 850 manuals
Add to My Manuals
Save this manual to your list of manuals |
Page 6 highlights
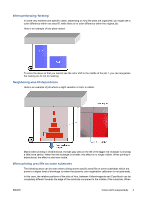
this occurs and when printing a large area fill of mainly a single color, a color shift can be seen between the middle of the substrate and the side of the substrate. This could also happen when the advance is not perfect, but in this case, horizontal banding should be visible. To solve this, perform the best Dynamic Color Registration you can achieve refer to the Service Manual. Blurred or defective areas on edges or lines When printing in bidirectional, insome cases, the beginning ofthe text and the area fills could be lacking in sharpness on the edge area of the substrate on the cartridges side, not as sharp as the sections on the side of the ecabinet/HP Internal Printer Server PC. In order to reduce this effect, some 'spit bars' can be added on the edge, towards the cartridge side. There are two ways to add them: ● Select nesting from the HP Internal Printer Server, adding the following file located under: C:\Users \windows Login\Documents\HP IPS\Spit Bars, select the spit bar of the same resolution as the job to print, and place the spit bar on the right of the image on the IPS (this will then be printed on the left part, towards the cartridge) ● Adding it on the RIP, take from the HP Internal Printer Server, the right spit bars to print, available under: C:\Users\windows Login\Documents\HP IPS\Spit Bars, take a file ending by 'HR_1.tif' Do NOT use the default spit bars from the RIP as it will not print any bars with Light Cyan, or Light magenta. NOTE: Width of the recommended spit bars is 3.5 cm (1.4") How to achieve better consistency between jobs of the same length How to reduce as much as possible the length variability between jobs of the same length. 1. Select a substrate which is less susceptible to media expansion when being printed on. Most paper based media, such as the HP photorealistic or offset media, have a tendency to expand. ● In case you still have to print on media susceptible to media expansion: ◦ Ensure that the density of ink is similar between each tile (if not, the tile with less ink might be shorter). ◦ If possible increase the heating temperature. ◦ Reduce as much as possible the ink restrictions. ● Make sure that the roll is left within the room where the printer is located for at least 24h, this is to ensure the complete roll is has the same temperature as the printer. 2. DO NOT TOUCH the Print Adjustments (no change of media advance compensation). 3. Print all the tiles at once. ● Do not split the jobs at different times (1 tile one day, and the 2nd tile the 2nd day) ● Do NOT change the printmode or the media width between tiles. To print the tiles all at once, we recommend the following: a. Create the tiles from the HP Internal Printer Server (IPS). b. If you are creating the tiles from the RIP, ensure that you send all the tiles within the same jobs sent to the printer/HP Internal Printer Server. 4 Troubleshoot Image Quality issues ENWW
-
 1
1 -
 2
2 -
 3
3 -
 4
4 -
 5
5 -
 6
6 -
 7
7 -
 8
8 -
 9
9 -
 10
10
 |
 |