HP Latex 850 Troubleshoot Image Quality issues - Page 9
Print Adjustment, Advance, Color Registration, Click on Apply.
 |
View all HP Latex 850 manuals
Add to My Manuals
Save this manual to your list of manuals |
Page 9 highlights
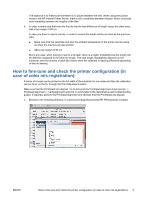
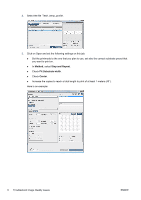
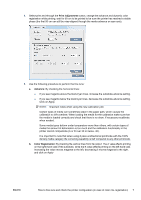
4. Select print and through the Print Adjustment button, change the advance and dynamic color registration while printing, wait for 50 cm to be printed to be sure the printer has reached a stable phase (the first 50 cm can still be miss-aligned through the media advance or scan axis). 5. Use the following procedure to perform the fine tune: a. Advance: By checking the horizontal lines: ● If you see magenta above the black/cyan lines, increase the substrate-advance setting. ● If you see magenta below the black/cyan lines, decrease the substrate-advance setting. Click on Apply. NOTE: Important notes when using the new calibration plot: Certain types of media can sometimes skew in the paper path, which causes the calibration to drift overtime. When loading the media for the calibration make sure that the media is loaded correctly and check that there is no skew. If necessary recalibrate when needed. Some media types deform under temperature more than others, with certain types of media the amount of deformation is too much and the calibration functionality in the printer cannot compensate (A or B over 30 or below -30). It is important to note that when using 8 pass unidirectional printmode with the 100% density media category the correcting capability is half compared to any other printmode. b. Color Registration: By checking the vertical lines from the output. The A value affects printing on the right-hand side of the substrate, while the B value affects printing on the left-hand side. Increasing the value moves magenta to the left, decreasing it moves magenta to the right, and click on Apply ENWW How to fine-tune and check the printer configuration (in case of color mis-registration): 7
-
 1
1 -
2
-
3
-
 4
4 -
 5
5 -
 6
6 -
 7
7 -
 8
8 -
 9
9 -
 10
10
 |
 |
