HP M3027 HP LaserJet M3027/M3035 MFP - User Guide for Model Numbers CB414A/CB4 - Page 80
Customize tray 1 operation, The device can be set to print from tray 1 if it is loaded
 |
UPC - 882780570054
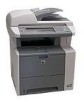
View all HP M3027 manuals
Add to My Manuals
Save this manual to your list of manuals |
Page 80 highlights
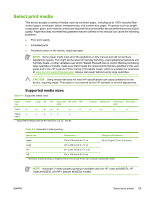
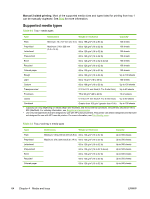
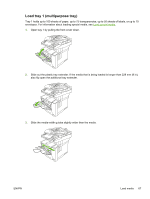
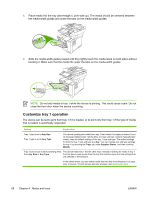
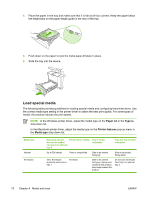
4. Place media into the tray (short-edge in, print-side up). The media should be centered between the media-width guides and under the tabs on the media-width guides. 5. Slide the media-width guides inward until they lightly touch the media stack on both sides without bending it. Make sure that the media fits under the tabs on the media-width guides. NOTE Do not add media to tray 1 while the device is printing. This could cause a jam. Do not close the front door when the device is printing. Customize tray 1 operation The device can be set to print from tray 1 if it is loaded, or to print only from tray 1 if the type of media that is loaded is specifically requested. Setting Explanation Tray 1 size is set to Any Size Tray 1 type is set to Any Type The device usually pulls media from tray 1 first unless it is empty or closed. If you do not keep media in tray 1 all the time, or if you use tray 1 only to manually feed media, keep the default settings of the tray 1 size and type. The default settings for both the tray 1 size and type are Any. You can change size and type settings for tray 1 by touching the Trays tab under Supplies Status, and then touching Modify. Tray 1 size or type is set to anything other The device treats tray 1 like the other trays. Instead of looking for media in tray 1 than Any Size or Any Type first, the device pulls media from the tray that matches type and size settings that are selected in the software. In the printer driver, you can select media from any tray (including tray 1) by type, size, or source. To print by type and size of paper, see Control print jobs. 68 Chapter 4 Media and trays ENWW
-
 1
1 -
2
-
3
-
4
-
5
-
6
-
7
-
8
-
9
-
10
-
11
-
12
-
13
-
14
-
15
-
16
-
17
-
18
-
19
-
20
-
21
-
22
-
23
-
24
-
25
-
26
-
27
-
28
-
29
-
30
-
31
-
32
-
33
-
34
-
35
-
36
-
37
-
38
-
39
-
40
-
41
-
42
-
43
-
44
-
45
-
46
-
47
-
48
-
49
-
50
-
51
-
52
-
53
-
54
-
55
-
56
-
57
-
58
-
59
-
60
-
61
-
62
-
63
-
64
-
65
-
66
-
67
-
68
-
69
-
70
-
71
-
72
-
73
-
74
-
 75
75 -
 76
76 -
 77
77 -
 78
78 -
 79
79 -
 80
80 -
 81
81 -
 82
82 -
 83
83 -
 84
84 -
 85
85 -
86
-
87
-
88
-
89
-
90
-
91
-
92
-
93
-
94
-
95
-
96
-
97
-
98
-
99
-
100
-
101
-
102
-
103
-
104
-
105
-
106
-
107
-
108
-
109
-
110
-
111
-
112
-
113
-
114
-
115
-
116
-
117
-
118
-
119
-
120
-
121
-
122
-
123
-
124
-
125
-
126
-
127
-
128
-
129
-
130
-
131
-
132
-
133
-
134
-
135
-
136
-
137
-
138
-
139
-
140
-
141
-
142
-
143
-
144
-
145
-
146
-
147
-
148
-
149
-
150
-
151
-
152
-
153
-
154
-
155
-
156
-
157
-
158
-
159
-
160
-
161
-
162
-
163
-
164
-
165
-
166
-
167
-
168
-
169
-
170
-
171
-
172
-
173
-
174
-
175
-
176
-
177
-
178
-
179
-
180
-
181
-
182
-
183
-
184
-
185
-
186
-
187
-
188
-
189
-
190
-
191
-
192
-
193
-
194
-
195
-
196
-
197
-
198
-
199
-
200
-
201
-
202
-
203
-
204
-
205
-
206
-
207
-
208
-
209
-
210
-
211
-
212
-
213
-
214
-
215
-
216
-
217
-
218
-
219
-
220
-
221
-
222
-
223
-
224
-
225
-
226
-
227
-
228
-
229
-
230
-
231
-
232
-
233
-
234
-
235
-
236
-
237
-
238
-
239
-
240
-
241
-
242
-
243
-
244
-
245
-
246
-
247
-
248
-
249
-
250
-
251
-
252
-
253
-
254
-
255
-
256
-
257
-
258
-
259
-
260
-
261
-
262
-
263
-
264
-
265
-
266
-
267
-
268
 |
 |
