HP Media Center 886c HP Media Center PCs - (English) MEDIA CENTER DVD+RW GUIDE - Page 15
Edit Style, Start, Capturing
 |
View all HP Media Center 886c manuals
Add to My Manuals
Save this manual to your list of manuals |
Page 15 highlights
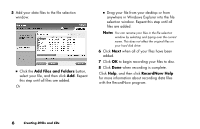
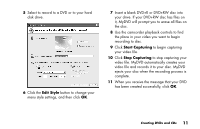
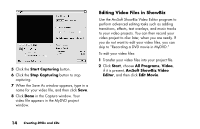
5 Select to record to a DVD or to your hard disk drive. 6 Click the Edit Style button to change your menu style settings, and then click OK. 7 Insert a blank DVD+R or DVD+RW disc into your drive. If your DVD+RW disc has files on it, MyDVD will prompt you to erase all files on the disc. 8 Use the camcorder playback controls to find the place in your video you want to begin recording to disc. 9 Click Start Capturing to begin capturing your video file. 10 Click Stop Capturing to stop capturing your video file. MyDVD automatically creates your video file and records it to your disc. MyDVD ejects your disc when the recording process is complete. 11 When you receive the message that your DVD has been created successfully, click OK. Creating DVDs and CDs 11
-
 1
1 -
2
-
3
-
4
-
5
-
6
-
7
-
8
-
9
-
 10
10 -
 11
11 -
 12
12 -
 13
13 -
 14
14 -
 15
15 -
 16
16 -
 17
17 -
 18
18 -
 19
19 -
 20
20 -
21
-
22
-
23
-
24
-
25
-
26
-
27
-
28
-
29
-
30
-
31
-
32
-
33
-
34
-
35
-
36
-
37
-
38
-
39
-
40
-
41
-
42
 |
 |
