HP Model 715/80 hp 9000 series 700 model 715 workstations service handbook (a2 - Page 123
Removing the Mounting Bracket
 |
View all HP Model 715/80 manuals
Add to My Manuals
Save this manual to your list of manuals |
Page 123 highlights
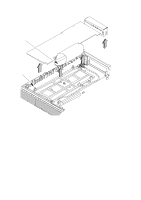
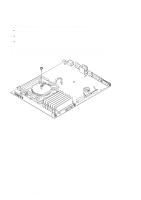
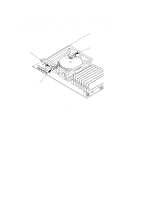
Lift up on the CRX or HCRX mounting bracket, slide it toward the rear of the system unit, and lift up, as shown in Figure 5-38. (When installing the mounting bracket, be sure the audio cable is routed as shown in Figure 5-38.) Audio Cable Figure 5-38. Removing the Mounting Bracket 5-38 Field Replaceable Units
-
 1
1 -
2
-
3
-
4
-
5
-
6
-
7
-
8
-
9
-
10
-
11
-
12
-
13
-
14
-
15
-
16
-
17
-
18
-
19
-
20
-
21
-
22
-
23
-
24
-
25
-
26
-
27
-
28
-
29
-
30
-
31
-
32
-
33
-
34
-
35
-
36
-
37
-
38
-
39
-
40
-
41
-
42
-
43
-
44
-
45
-
46
-
47
-
48
-
49
-
50
-
51
-
52
-
53
-
54
-
55
-
56
-
57
-
58
-
59
-
60
-
61
-
62
-
63
-
64
-
65
-
66
-
67
-
68
-
69
-
70
-
71
-
72
-
73
-
74
-
75
-
76
-
77
-
78
-
79
-
80
-
81
-
82
-
83
-
84
-
85
-
86
-
87
-
88
-
89
-
90
-
91
-
92
-
93
-
94
-
95
-
96
-
97
-
98
-
99
-
100
-
101
-
102
-
103
-
104
-
105
-
106
-
107
-
108
-
109
-
110
-
111
-
112
-
113
-
114
-
115
-
116
-
117
-
 118
118 -
 119
119 -
 120
120 -
 121
121 -
 122
122 -
 123
123 -
 124
124 -
 125
125 -
 126
126 -
 127
127 -
 128
128 -
129
-
130
-
131
-
132
-
133
-
134
-
135
-
136
-
137
-
138
-
139
-
140
-
141
-
142
-
143
-
144
-
145
-
146
-
147
-
148
-
149
-
150
 |
 |

5–38
Field Replaceable Units
Lift up on the CRX or HCRX mounting bracket, slide it toward the rear of the system
unit, and lift up, as shown in Figure 5–38. (When installing the mounting bracket, be
sure the audio cable is routed as shown in Figure 5–38.)
Audio Cable
Figure 5–38.
Removing the Mounting Bracket