HP Model 715/80 hp 9000 series 700 model 715 workstations service handbook (a2 - Page 128
Notched Snap Tab, Gently Pry Board
 |
View all HP Model 715/80 manuals
Add to My Manuals
Save this manual to your list of manuals |
Page 128 highlights
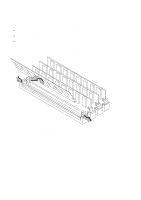
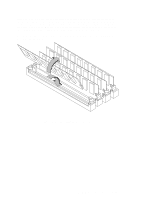
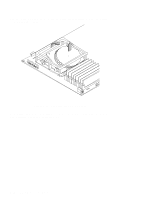
Use a small flatblade screwdriver to press in one of the two notched snap tabs on the carrier, as shown in Figure 5-43. At the same time, use another flatblade screwdriver to gently pry the PCX-T board at the corner edge nearest the snap tab to loosen it from its connection on the processor board. Repeat this sequence for the second tab on the carrier. Gently Pry Board Up Notched Snap Tab Notched Snap Tab Figure 5-43. Disconnecting the PCX-T Module Field Replaceable Units 5-43
-
 1
1 -
2
-
3
-
4
-
5
-
6
-
7
-
8
-
9
-
10
-
11
-
12
-
13
-
14
-
15
-
16
-
17
-
18
-
19
-
20
-
21
-
22
-
23
-
24
-
25
-
26
-
27
-
28
-
29
-
30
-
31
-
32
-
33
-
34
-
35
-
36
-
37
-
38
-
39
-
40
-
41
-
42
-
43
-
44
-
45
-
46
-
47
-
48
-
49
-
50
-
51
-
52
-
53
-
54
-
55
-
56
-
57
-
58
-
59
-
60
-
61
-
62
-
63
-
64
-
65
-
66
-
67
-
68
-
69
-
70
-
71
-
72
-
73
-
74
-
75
-
76
-
77
-
78
-
79
-
80
-
81
-
82
-
83
-
84
-
85
-
86
-
87
-
88
-
89
-
90
-
91
-
92
-
93
-
94
-
95
-
96
-
97
-
98
-
99
-
100
-
101
-
102
-
103
-
104
-
105
-
106
-
107
-
108
-
109
-
110
-
111
-
112
-
113
-
114
-
115
-
116
-
117
-
118
-
119
-
120
-
121
-
122
-
 123
123 -
 124
124 -
 125
125 -
 126
126 -
 127
127 -
 128
128 -
 129
129 -
 130
130 -
 131
131 -
 132
132 -
 133
133 -
134
-
135
-
136
-
137
-
138
-
139
-
140
-
141
-
142
-
143
-
144
-
145
-
146
-
147
-
148
-
149
-
150
 |
 |

5–43
Field Replaceable Units
Use a small flatblade screwdriver to press in one of the two notched snap tabs on the
carrier, as shown in Figure 5–43. At the same time, use another flatblade screwdriver
to gently pry the PCX-T board at the corner edge nearest the snap tab to loosen it
from its connection on the processor board. Repeat this sequence for the second tab
on the carrier.
Notched Snap Tab
Gently Pry Board
Up
Notched Snap Tab
Figure 5–43.
Disconnecting the PCX-T Module