HP Officejet Pro 8500A User Guide - Page 233
Cartridge Problem, Solution 3: Clean the electrical contacts
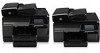 |
View all HP Officejet Pro 8500A manuals
Add to My Manuals
Save this manual to your list of manuals |
Page 233 highlights
To solve this problem, try the following solutions. Solutions are listed in order, with the most likely solution first. If the first solution does not solve the problem, continue trying the remaining solutions until the issue is resolved. • Solution 1: Turn the printer off and on. • Solution 2: Install the printheads correctly. • Solution 3: Clean the electrical contacts. • Solution 4: Replace the printhead. Solution 1: Turn the printer off and on. Turn off the printer, and then turn it on again. If the problem persists, try the next solution. Solution 2: Install the printheads correctly. Make sure all of the printheads are properly installed: CAUTION: The printheads contain electrical contacts contain sensitive electronic components that can be damaged easily. 1. Open the print-carriage access door. 2. Touch Change Printheads on the printer control panel. Wait for the carriage to stop moving, and then unplug the power cord from the printer. 3. Lift the printhead latch. 4. Lift the handle of the printhead (which corresponds to the message) and use it to pull the printhead out of its slot. 5. Insert the printhead into its color-coded slot. (The label on the printhead must match the label on the printhead latch). Press down firmly on the printhead to ensure proper contact. 6. If necessary, repeat the steps for the remaining printhead. 7. Pull the printhead latch all the way forward, and then press down to ensure that the latch is engaged correctly. You might have to apply some pressure to engage the latch. 8. Close the print-carriage access door and check if the error message has gone away. If the problem persists, try the next solution. Solution 3: Clean the electrical contacts Clean the electrical contacts on the printhead. For more information, see To clean the printhead contacts manually. If the problem persists, try the next solution. Solution 4: Replace the printhead Replace the indicated printhead. For more information, see Solve wireless problems. NOTE: If the printhead is still under warranty, contact HP support for service or replacement. For more information about the printhead warranty, see Solve wireless problems. If the problem persists after you replace the cartridge, contact HP support. For more information, see HP support. Cartridge Problem The ink cartridge identified in the message is missing, damaged, or inserted into the wrong slot in the printer. NOTE: If the cartridge is identified in the message as incompatible, seeOrder printing supplies online for information about obtaining cartridges for the printer. Cartridge Problem 229
-
 1
1 -
2
-
3
-
4
-
5
-
6
-
7
-
8
-
9
-
10
-
11
-
12
-
13
-
14
-
15
-
16
-
17
-
18
-
19
-
20
-
21
-
22
-
23
-
24
-
25
-
26
-
27
-
28
-
29
-
30
-
31
-
32
-
33
-
34
-
35
-
36
-
37
-
38
-
39
-
40
-
41
-
42
-
43
-
44
-
45
-
46
-
47
-
48
-
49
-
50
-
51
-
52
-
53
-
54
-
55
-
56
-
57
-
58
-
59
-
60
-
61
-
62
-
63
-
64
-
65
-
66
-
67
-
68
-
69
-
70
-
71
-
72
-
73
-
74
-
75
-
76
-
77
-
78
-
79
-
80
-
81
-
82
-
83
-
84
-
85
-
86
-
87
-
88
-
89
-
90
-
91
-
92
-
93
-
94
-
95
-
96
-
97
-
98
-
99
-
100
-
101
-
102
-
103
-
104
-
105
-
106
-
107
-
108
-
109
-
110
-
111
-
112
-
113
-
114
-
115
-
116
-
117
-
118
-
119
-
120
-
121
-
122
-
123
-
124
-
125
-
126
-
127
-
128
-
129
-
130
-
131
-
132
-
133
-
134
-
135
-
136
-
137
-
138
-
139
-
140
-
141
-
142
-
143
-
144
-
145
-
146
-
147
-
148
-
149
-
150
-
151
-
152
-
153
-
154
-
155
-
156
-
157
-
158
-
159
-
160
-
161
-
162
-
163
-
164
-
165
-
166
-
167
-
168
-
169
-
170
-
171
-
172
-
173
-
174
-
175
-
176
-
177
-
178
-
179
-
180
-
181
-
182
-
183
-
184
-
185
-
186
-
187
-
188
-
189
-
190
-
191
-
192
-
193
-
194
-
195
-
196
-
197
-
198
-
199
-
200
-
201
-
202
-
203
-
204
-
205
-
206
-
207
-
208
-
209
-
210
-
211
-
212
-
213
-
214
-
215
-
216
-
217
-
218
-
219
-
220
-
221
-
222
-
223
-
224
-
225
-
226
-
227
-
 228
228 -
 229
229 -
 230
230 -
 231
231 -
 232
232 -
 233
233 -
 234
234 -
 235
235 -
 236
236 -
 237
237 -
 238
238 -
239
-
240
-
241
-
242
-
243
-
244
-
245
-
246
 |
 |