HP Officejet Pro L7400 User Guide - Page 66
CAUTION, If the control panel message remains, repeat the cleaning procedure described
 |
View all HP Officejet Pro L7400 manuals
Add to My Manuals
Save this manual to your list of manuals |
Page 66 highlights
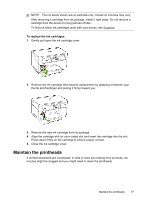
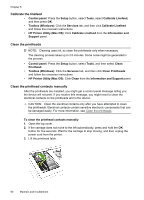
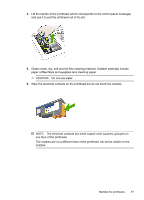
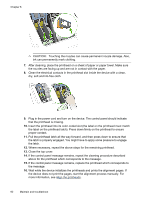
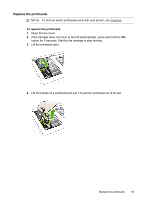
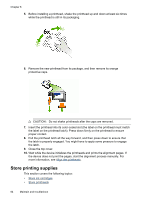
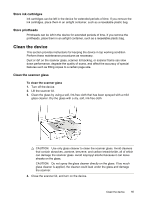
Chapter 8 CAUTION: Touching the nozzles can cause permanent nozzle damage. Also, ink can permanently mark clothing. 7. After cleaning, place the printhead on a sheet of paper or paper towel. Make sure the nozzles are facing up and are not in contact with the paper. 8. Clean the electrical contacts in the printhead slot inside the device with a clean, dry, soft and lint-free cloth. 9. Plug in the power cord and turn on the device. The control panel should indicate that the printhead is missing. 10. Insert the printhead into its color-coded slot (the label on the printhead must match the label on the printhead latch). Press down firmly on the printhead to ensure proper contact. 11. Pull the printhead latch all the way forward, and then press down to ensure that the latch is properly engaged. You might have to apply some pressure to engage the latch. 12. Where necessary, repeat the above steps for the remaining printhead. 13. Close the top cover. 14. If the control panel message remains, repeat the cleaning procedure described above for the printhead which corresponds to the message. 15. If the control panel message remains, replace the printhead which corresponds to the message. 16. Wait while the device initializes the printheads and prints the alignment pages. If the device does not print the pages, start the alignment process manually. For more information, see Align the printheads. 62 Maintain and troubleshoot
-
 1
1 -
2
-
3
-
4
-
5
-
6
-
7
-
8
-
9
-
10
-
11
-
12
-
13
-
14
-
15
-
16
-
17
-
18
-
19
-
20
-
21
-
22
-
23
-
24
-
25
-
26
-
27
-
28
-
29
-
30
-
31
-
32
-
33
-
34
-
35
-
36
-
37
-
38
-
39
-
40
-
41
-
42
-
43
-
44
-
45
-
46
-
47
-
48
-
49
-
50
-
51
-
52
-
53
-
54
-
55
-
56
-
57
-
58
-
59
-
60
-
 61
61 -
 62
62 -
 63
63 -
 64
64 -
 65
65 -
 66
66 -
 67
67 -
 68
68 -
 69
69 -
 70
70 -
 71
71 -
72
-
73
-
74
-
75
-
76
-
77
-
78
-
79
-
80
-
81
-
82
-
83
-
84
-
85
-
86
-
87
-
88
-
89
-
90
-
91
-
92
-
93
-
94
-
95
-
96
-
97
-
98
-
99
-
100
-
101
-
102
-
103
-
104
-
105
-
106
-
107
-
108
-
109
-
110
-
111
-
112
-
113
-
114
-
115
-
116
-
117
-
118
-
119
-
120
 |
 |
