HP Pavilion 13-b200 Pavilion 13 Notebook PC - Page 51
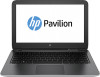
The 1/black WLAN antenna cable is connected to the WLAN module 1/Main terminal.
 |
View all HP Pavilion 13-b200 manuals
Add to My Manuals
Save this manual to your list of manuals |
Page 51 highlights
4. Remove the keyboard/top cover (see Keyboard/top cover on page 28). 5. Disconnect the battery cable from the system board (see Battery on page 33). Remove the display assembly: 1. Release the ZIF connector (1) to which the display panel cable is attached, and then disconnect the display panel cable from the system board. 2. Release the display panel cable from the routing channel (2) built into the bottom cover. 3. Disconnect the WLAN antenna cable (3) from the terminal on the WLAN module. NOTE: The 1/black WLAN antenna cable is connected to the WLAN module 1/Main terminal. 4. Release the wireless antenna cable from the routing clip (4) built into the bottom cover. 5. Remove the six Phillips PM2.5×5.7 screws (1) that secure the display assembly to the bottom cover. Component replacement procedures 41
-
 1
1 -
2
-
3
-
4
-
5
-
6
-
7
-
8
-
9
-
10
-
11
-
12
-
13
-
14
-
15
-
16
-
17
-
18
-
19
-
20
-
21
-
22
-
23
-
24
-
25
-
26
-
27
-
28
-
29
-
30
-
31
-
32
-
33
-
34
-
35
-
36
-
37
-
38
-
39
-
40
-
41
-
42
-
43
-
44
-
45
-
 46
46 -
 47
47 -
 48
48 -
 49
49 -
 50
50 -
 51
51 -
 52
52 -
 53
53 -
 54
54 -
 55
55 -
 56
56 -
57
-
58
-
59
-
60
-
61
-
62
-
63
-
64
-
65
-
66
-
67
-
68
-
69
-
70
-
71
-
72
-
73
-
74
-
75
-
76
-
77
-
78
-
79
-
80
-
81
-
82
-
83
-
84
-
85
-
86
-
87
 |
 |
