HP Pavilion 15-b100 HP Pavilion 15 Sleekbook Maintenance and Service Guide - Page 54
Memory module see, system board and installed on the replacement system board
 |
View all HP Pavilion 15-b100 manuals
Add to My Manuals
Save this manual to your list of manuals |
Page 54 highlights
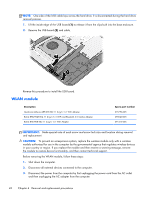
Before removing the system board, follow these steps: 1. Shut down the computer. 2. Disconnect all external devices connected to the computer. 3. Disconnect the power from the computer by first unplugging the power cord from the AC outlet and then unplugging the AC adapter from the computer. 4. Remove the battery (see Battery on page 30). 5. Remove the keyboard (see Keyboard on page 31). 6. Remove the top cover (see Top cover on page 35). 7. Remove the hard drive (see Hard drive on page 39). 8. Remove the USB board (see USB board on page 41). 9. Remove the WLAN (see WLAN module on page 42). After removing the system board, be sure that the following components are removed from the defective system board and installed on the replacement system board: ● Memory module (see Memory module on page 49) ● RTC battery (see RTC battery on page 51) ● Heat sink (see Heat sink on page 54) ● PCH heat sink (see PCH heat sink on page 52) Remove the system board: 46 Chapter 4 Removal and replacement procedures
-
 1
1 -
2
-
3
-
4
-
5
-
6
-
7
-
8
-
9
-
10
-
11
-
12
-
13
-
14
-
15
-
16
-
17
-
18
-
19
-
20
-
21
-
22
-
23
-
24
-
25
-
26
-
27
-
28
-
29
-
30
-
31
-
32
-
33
-
34
-
35
-
36
-
37
-
38
-
39
-
40
-
41
-
42
-
43
-
44
-
45
-
46
-
47
-
48
-
 49
49 -
 50
50 -
 51
51 -
 52
52 -
 53
53 -
 54
54 -
 55
55 -
 56
56 -
 57
57 -
 58
58 -
 59
59 -
60
-
61
-
62
-
63
-
64
-
65
-
66
-
67
-
68
-
69
-
70
-
71
-
72
-
73
-
74
-
75
-
76
-
77
-
78
-
79
-
80
-
81
-
82
-
83
-
84
-
85
-
86
-
87
-
88
-
89
-
90
-
91
-
92
-
93
-
94
-
95
-
96
 |
 |
