HP Pavilion 15-b100 HP Pavilion 15 Sleekbook Maintenance and Service Guide - Page 70
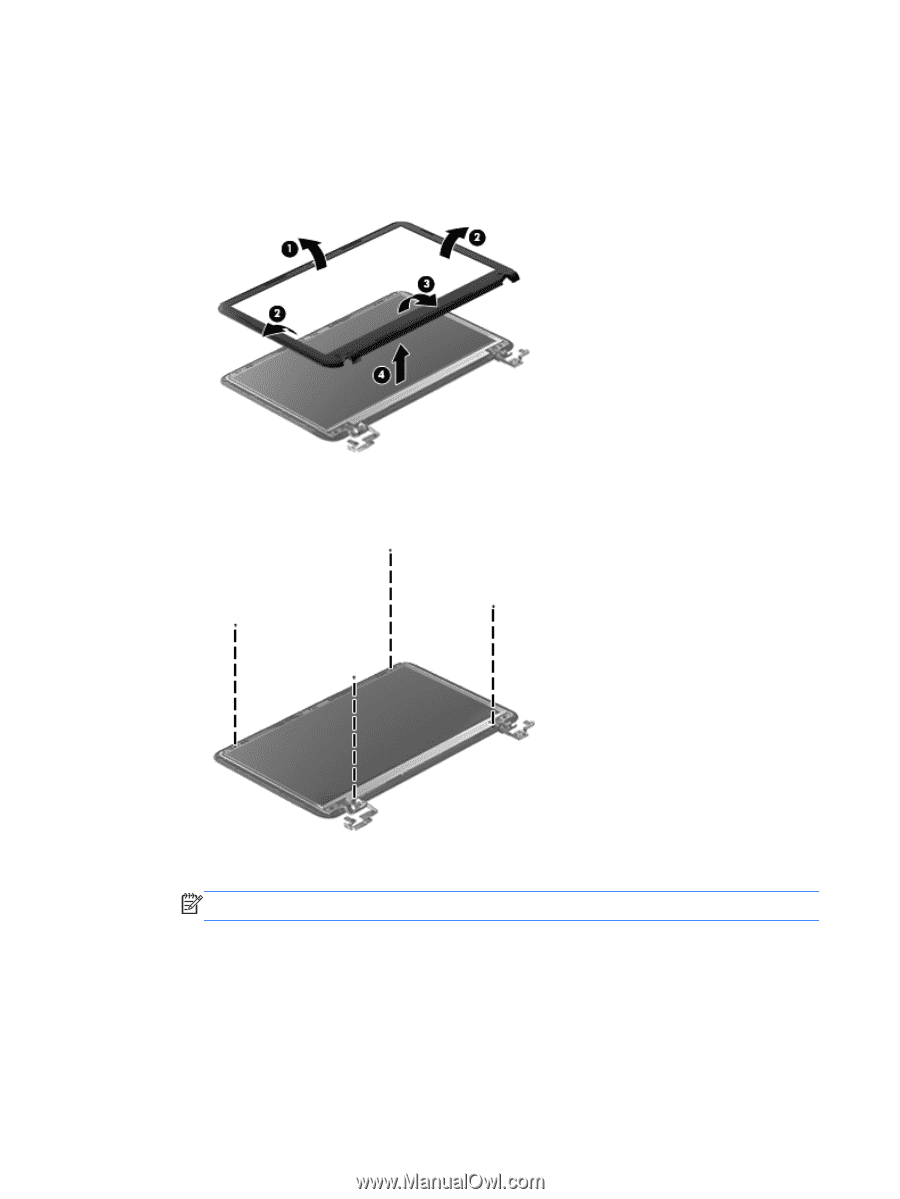
If it is necessary to remove the display panel
 |
View all HP Pavilion 15-b100 manuals
Add to My Manuals
Save this manual to your list of manuals |
Page 70 highlights
c. Flex the inside edges of the top edge (1), the left and right sides (2), and the bottom edge (3) of the display bezel until the bezel disengages from the display enclosure. d. Remove the display bezel (4). The display bezel is available using spare part number 701680-001. 4. If it is necessary to remove the display panel: a. Remove the four Phillips screws that secure the display panel to the display enclosure. b. Lift the top edge of the display panel, and swing it (1) up and forward toward the keyboard. NOTE: Support the display panel as you lean the panel forward. c. Release the adhesive support strip (2) that secures the display panel cable to the display panel. d. Disconnect the display panel cable (3) from the display panel. 62 Chapter 4 Removal and replacement procedures
-
 1
1 -
2
-
3
-
4
-
5
-
6
-
7
-
8
-
9
-
10
-
11
-
12
-
13
-
14
-
15
-
16
-
17
-
18
-
19
-
20
-
21
-
22
-
23
-
24
-
25
-
26
-
27
-
28
-
29
-
30
-
31
-
32
-
33
-
34
-
35
-
36
-
37
-
38
-
39
-
40
-
41
-
42
-
43
-
44
-
45
-
46
-
47
-
48
-
49
-
50
-
51
-
52
-
53
-
54
-
55
-
56
-
57
-
58
-
59
-
60
-
61
-
62
-
63
-
64
-
 65
65 -
 66
66 -
 67
67 -
 68
68 -
 69
69 -
 70
70 -
 71
71 -
 72
72 -
 73
73 -
 74
74 -
 75
75 -
76
-
77
-
78
-
79
-
80
-
81
-
82
-
83
-
84
-
85
-
86
-
87
-
88
-
89
-
90
-
91
-
92
-
93
-
94
-
95
-
96
 |
 |