HP Pavilion 7700 HP Pavilion PC's - (English) Philips CDD-4801 CD-RW User's Ma - Page 13
Audio cable, Digital or, analogue, Data cable, Power, cable, Data Cable, Cable, Audio, digital,
 |
View all HP Pavilion 7700 manuals
Add to My Manuals
Save this manual to your list of manuals |
Page 13 highlights
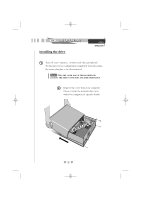
01_LAYOUT_GB 22-11-2000 09:21 Pagina 7 CDRW INSTALLATION (CONT.) ENGLISH 5 Locate the free end of the IDE data cable and thread it out through the open drive bay. Do the same with the power cable and the (optional) audio cable (digital or analogue). Your system will either be equipped with an analogue or digital soundcard connector. Use the appropriate connector on the drive recognisable with the amount of pins. Power Cable IDE Data Cable Audio Audio Cable Cable (analogue) (digital) 6 Connect your (optional) audio cable, IDE data cable and the power cable into the back of the CDRW 8x4x32. Make sure you correctly align pin 1 of the cable to pin 1 of the connectors. 1 1 Power 1 cable Audio cable (Digital or analogue) IDE Data cable 7
-
 1
1 -
2
-
3
-
4
-
5
-
6
-
7
-
 8
8 -
 9
9 -
 10
10 -
 11
11 -
 12
12 -
 13
13 -
 14
14 -
 15
15 -
 16
16 -
 17
17 -
 18
18 -
19
-
20
-
21
-
22
-
23
-
24
-
25
-
26
-
27
-
28
-
29
-
30
-
31
-
32
-
33
-
34
-
35
-
36
-
37
 |
 |

ENGLISH
CDRW
INSTALLATION
INSTALLATION
(CONT.)
7
5
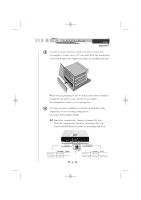
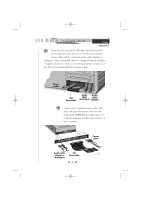
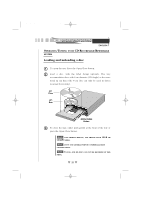
Locate the free end of the IDE data cable and thread it
out through the open drive bay. Do the same with the
power cable and the (optional) audio cable (digital or
analogue). Your system will either be equipped with an analogue
or digital soundcard connector. Use the appropriate connector on
the drive recognisable with the amount of pins.
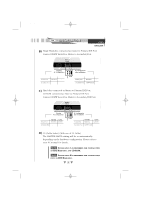
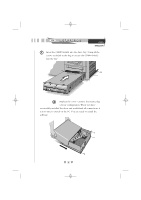
6
Connect your (optional) audio cable, IDE
data cable and the power cable into the
back of the CDRW 8x4x32. Make sure you
correctly align pin 1 of the cable to pin 1 of
the connectors.
Audio cable
(Digital or
analogue)
IDE
Data cable
Power
cable
1
1
1
IDE
Data Cable
Power
Cable
Audio
Cable
(digital)
Audio
Cable
(analogue)
01_LAYOUT_GB
22-11-2000
09:21
Pagina 7