HP Pavilion xf145 HP Pavilion Notebook ZE1000 & XF100 Series PCs - Trouble - Page 34
Removing the Hard Disk Tray, Reassembly Notes
 |
View all HP Pavilion xf145 manuals
Add to My Manuals
Save this manual to your list of manuals |
Page 34 highlights
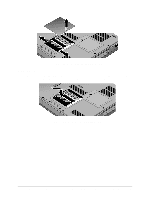
Screws, M2.5x4mm (2) Screws, M2.5x4mm (2) Figure 9. Removing the Hard Disk Tray Reassembly Notes • Insert the connector end of the drive through the opening in the carrier, then lower the drive into place. • Carefully slide the new drive into the hard drive compartment. Press firmly to make sure its connector seats properly. Important If you are installing a new hard disk drive, install the factory software and operating system on the drive before loading any additional software-see "Recovering the Factory Software Installation" on page 29. 34 Removing and Replacing Parts ze1000 Series Troubleshooting and Self-Repair Guide
-
 1
1 -
2
-
3
-
4
-
5
-
6
-
7
-
8
-
9
-
10
-
11
-
12
-
13
-
14
-
15
-
16
-
17
-
18
-
19
-
20
-
21
-
22
-
23
-
24
-
25
-
26
-
27
-
28
-
 29
29 -
 30
30 -
 31
31 -
 32
32 -
 33
33 -
 34
34 -
 35
35 -
 36
36 -
 37
37 -
 38
38 -
 39
39 -
40
-
41
-
42
-
43
-
44
 |
 |

34
Removing and Replacing Parts
ze1000 Series Troubleshooting and Self-Repair Guide
Figure 9. Removing the Hard Disk Tray
Reassembly Notes
•
Insert the connector end of the drive through the opening in the carrier, then lower the drive into
place.
•
Carefully slide the new drive into the hard drive compartment. Press firmly to make sure its
connector seats properly.
Important
If you are installing a new hard disk drive, install the factory software and operating system on the
drive before loading any additional software—see “Recovering the Factory Software Installation”
on page 29.
Screws,
M2.5x4mm (2)
Screws,
M2.5x4mm (2)