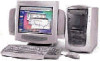
HP Pavilion xl900 HP Pavilion Desktop PCs - (English) Upgrading and Servicing - Page 27
Drive Cage In and Out
 |
View all HP Pavilion xl900 manuals
Add to My Manuals
Save this manual to your list of manuals |
Page 27 highlights
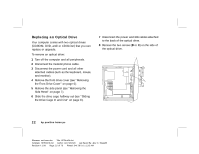
English 9 Remove the screw(s) on the other side of the drive. Note: If a screw is inaccessible, you'll need to remove the drive cage from the chassis. Before removing the cage, you need to disconnect all the cables that are attached to the drives in the cage. Be sure to make note of the cable placements so you'll be able to reconnect them. 10 Push the optical drive out through the front of the drive cage. To install a new optical drive: Note: Make sure the jumper on the new drive is in the CS (Cable Select) position. 1 Slide the new drive through the optical drive bay in the drive cage. 2 Connect the cables to the back of the drive. 3 Align the screw holes and attach the screws. To reassemble the computer: 1 Slide the drive cage back in (see "Sliding the Drive Cage In and Out" on page 8). 2 Replace the side panel (see "Replacing the Side Panel" on page 27). 3 Reconnect the power cord and all other cables. 4 Reconnect the modem/phone cable. 5 Turn on the computer and all peripherals. 6 Install any software drivers supplied by the drive manufacturer. upgrading and servicing the pc 23 Filename: ma1rwsc.doc Title: HP-Print2k.dot Template: HP-Print2K.dot Author: Ann Schmidt Last Saved By: Jerry C. Stogsdill Revision #: 198 Page: 23 of 70 Printed: 04/26/01 11:33 AM
-
 1
1 -
2
-
3
-
4
-
5
-
6
-
7
-
8
-
9
-
10
-
11
-
12
-
13
-
14
-
15
-
16
-
17
-
18
-
19
-
20
-
21
-
 22
22 -
 23
23 -
 24
24 -
 25
25 -
 26
26 -
 27
27 -
 28
28 -
 29
29 -
 30
30 -
 31
31 -
 32
32 -
33
-
34
-
35
-
36
-
37
-
38
-
39
-
40
-
41
-
42
-
43
-
44
-
45
-
46
-
47
-
48
-
49
-
50
-
51
-
52
-
53
-
54
-
55
-
56
-
57
-
58
-
59
-
60
-
61
-
62
-
63
-
64
-
65
-
66
-
67
-
68
-
69
-
70
-
71
-
72
-
73
-
74
-
75
-
76
-
77
-
78
-
79
-
80
-
81
-
82
-
83
-
84
-
85
-
86
-
87
-
88
-
89
-
90
-
91
-
92
-
93
-
94
-
95
-
96
-
97
-
98
-
99
-
100
-
101
-
102
-
103
-
104
-
105
-
106
-
107
-
108
-
109
-
110
-
111
-
112
-
113
-
114
-
115
-
116
-
117
-
118
-
119
-
120
-
121
-
122
-
123
-
124
-
125
-
126
-
127
-
128
-
129
-
130
-
131
-
132
-
133
-
134
-
135
-
136
-
137
-
138
-
139
-
140
 |
 |
