HP Photosmart 8400 HP Photosmart Networking Guide - Page 13
Macintosh users: network your printer - series
 |
View all HP Photosmart 8400 manuals
Add to My Manuals
Save this manual to your list of manuals |
Page 13 highlights
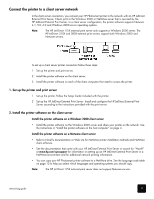
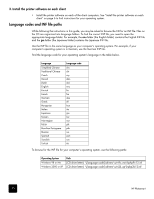
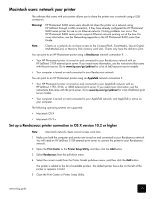
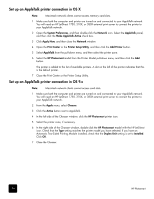
Macintosh users: network your printer The software that came with your printer allows you to share the printer over a network using a USB connection. Warning! HP Photosmart 8400 series users should not share the printer on a network using HP JetDirect through a USB connection, if they have already configured the HP Photosmart 8400 series printer for use on an Ethernet network. Printing problems can occur. The HP Photosmart 8400 series printer supports Ethernet network printing out of the box. For more information, see the Networking appendix in the HP Photosmart 8400 series User Guide. Note: Clients on a network do not have access to the CompactFlash, SmartMedia, Secure Digital, MultiMediaCard, or Memory Stick memory card slots. Clients only have the ability to print. You can print to an HP Photosmart printer using a Rendezvous network connection if: • Your HP Photosmart printer is turned on and connected to your Rendezvous network with an HP JetDirect 310X external print server. If you need more information, see the instructions that came with the print server. Go to www.hp.com/go/jetdirect for a list of JetDirect print server models. • Your computer is turned on and connected to your Rendezvous network. You can print to an HP Photosmart printer using an AppleTalk network connection if: • Your HP Photosmart printer is turned on and connected to your AppleTalk network with an HP JetDirect 175X, 310X, or 380X external print server. If you need more information, see the instructions that came with the print server. Go to www.hp.com/go/jetdirect for a list of JetDirect print server models. • Your computer is turned on and connected to your AppleTalk network, and AppleTalk is active on your computer. The following operating systems are supported: • Macintosh OS X • Macintosh OS 9.x Set up a Rendezvous printer connection in OS X version 10.2 or higher Note: Macintosh network clients cannot access card slots. 1 Make sure both the computer and printer are turned on and connected to your Rendezvous network. You will need an HP JetDirect 310X external print server to connect the printer to your Rendezvous network. 2 Open the Print Center or the Printer Setup Utility, and then click the Add button. 3 Select Rendezvous from the pull-down menu. 4 Select the correct model from the Printer Model pull-down menu, and then click the Add button. The printer is added to the list of available printers. The default printer has a dot on the left of the printer or appears in bold. 5 Close the Print Center or Printer Setup Utility. networking guide 13
-
 1
1 -
2
-
3
-
4
-
5
-
6
-
7
-
 8
8 -
 9
9 -
 10
10 -
 11
11 -
 12
12 -
 13
13 -
 14
14 -
 15
15
 |
 |
