HP Photosmart C4340 Basics Guide - Page 40
Setup troubleshooting, The product will not turn - with windows 7
 |
View all HP Photosmart C4340 manuals
Add to My Manuals
Save this manual to your list of manuals |
Page 40 highlights
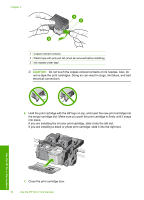
Troubleshooting and support Chapter 4 When the software installation is complete, the HP Digital Imaging Monitor icon appears in the Windows system tray. To verify that the software is properly installed, double-click the HP Solution Center icon on the desktop. If the HP Solution Center shows the essential icons (Scan Picture and Scan Document), the software has been properly installed. Setup troubleshooting Use this section to solve any problems you might encounter while setting up the HP All-in-One hardware. The product will not turn on Try the following solutions if there are no light indications, no noise, and no movement from the product when you turn it on. Solution 1: Make sure you use the power cord that came with the product Solution • Make sure the power cord is firmly connected to both the product and the power adapter. Plug the power cord into a power outlet, surge protector, or power strip. 1 Power connection 2 Power cord and adapter 3 Power outlet • If you are using a power strip, make sure the power strip is turned on. Or, try plugging the product directly into a power outlet. • Test the power outlet to make sure it is working. Plug in an appliance that you know works, and see if the appliance has power. If not, then there might be a problem with the power outlet. • If you plugged the product into a switched outlet, make sure the outlet is switched on. If it is switched to on but still does not work, then there might be a problem with the power outlet. Cause: The product was not being used with the power cord provided. If this did not solve the issue, try the next solution. Solution 2: Reset the product Solution: Turn off the product, and then unplug the power cord. Plug the power cord back in, and then press the On button to turn on the product. 38 Troubleshooting and support
-
 1
1 -
2
-
3
-
4
-
5
-
6
-
7
-
8
-
9
-
10
-
11
-
12
-
13
-
14
-
15
-
16
-
17
-
18
-
19
-
20
-
21
-
22
-
23
-
24
-
25
-
26
-
27
-
28
-
29
-
30
-
31
-
32
-
33
-
34
-
 35
35 -
 36
36 -
 37
37 -
 38
38 -
 39
39 -
 40
40 -
 41
41 -
 42
42 -
 43
43 -
 44
44 -
 45
45 -
46
-
47
-
48
-
49
-
50
-
51
-
52
-
53
-
54
-
55
-
56
-
57
-
58
-
59
-
60
-
61
-
62
-
63
 |
 |
