HP Photosmart e-All-in-One Printer - D110 Reference Guide - Page 1
HP Photosmart e-All-in-One Printer - D110 Manual
 |
View all HP Photosmart e-All-in-One Printer - D110 manuals
Add to My Manuals
Save this manual to your list of manuals |
Page 1 highlights
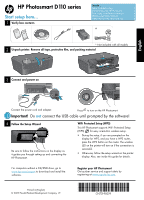
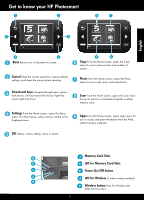
HP Photosmart D110 series Start setup here... 1 Verify box contents Inside... Setup troubleshooting 2 Get to know your HP Photosmart 3 Print, copy, scan features and tips 4 What's new? Web Services 5 Networked printer setup and use 6 * Not included with all models 2 Unpack printer. Remove all tape, protective film, and packing material English 3 Connect and power on Connect the power cord and adapter. Press to turn on the HP Photosmart. Important! Do not connect the USB cable until prompted by the software! 4 Follow the Setup Wizard Be sure to follow the instructions on the display as it guides you through setting up and connecting the HP Photosmart. WiFi Protected Setup (WPS) This HP Photosmart supports WiFi Protected Setup (WPS) for easy one-button wireless setup. • During the setup, if you are prompted on the display for WPS, and you have a WPS router, press the WPS button on the router. The wireless LED on the printer will turn on if the connection is successful. • Otherwise, follow the setup wizard on the printer display. Also, see inside this guide for details. For computers without a CD/DVD drive, go to www.hp.com/support to download and install the software. Printed in [English] © 2009 Hewlett-Packard Development Company, L.P. Register your HP Photosmart Get quicker service and support alerts by registering at www.register.hp.com. *CN731-90029* *CN731-90029* CN731-90029
-
 1
1 -
 2
2 -
 3
3 -
 4
4 -
 5
5 -
 6
6 -
 7
7 -
8
 |
 |