HP Presario 300 Presario 305 Series Maintenance and Service Guide - Page 10
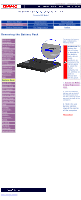
Bottom of Unit
 |
View all HP Presario 300 manuals
Add to My Manuals
Save this manual to your list of manuals |
Page 10 highlights
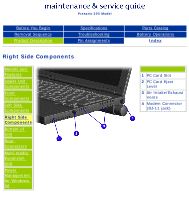
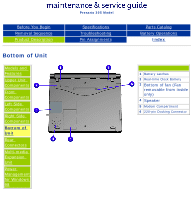
Before You Begin Removal Sequence Product Description Bottom of Unit Models and Features Upper Unit Components Front Components Left Side Components Right Side Components Bottom of Unit Rear Connectors Multi-media Expansion Unit Power Management for Windows 98 Presario 305 Model Specifications Troubleshooting Pin Assignments Parts Catalog Battery Operations Index 1 Battery Latches 2 Real-time Clock Battery 3 Bottom of fan (Fan removable from inside only) 4 Speaker 5 Modem Compartment 6 220-pin Docking Connector
-
 1
1 -
2
-
3
-
4
-
 5
5 -
 6
6 -
 7
7 -
 8
8 -
 9
9 -
 10
10 -
 11
11 -
 12
12 -
 13
13 -
 14
14 -
 15
15 -
16
-
17
-
18
-
19
-
20
-
21
-
22
-
23
-
24
-
25
-
26
-
27
-
28
-
29
-
30
-
31
-
32
-
33
-
34
-
35
-
36
-
37
-
38
-
39
-
40
-
41
-
42
-
43
-
44
-
45
-
46
-
47
-
48
-
49
-
50
-
51
-
52
-
53
-
54
-
55
-
56
-
57
-
58
-
59
-
60
-
61
-
62
-
63
-
64
-
65
-
66
-
67
-
68
-
69
-
70
-
71
-
72
-
73
-
74
-
75
-
76
-
77
-
78
-
79
-
80
-
81
 |
 |

Presario 305 Model
Before You Begin
Specifications
Parts Catalog
Removal Sequence
Troubleshooting
Battery Operations
Product Description
Pin Assignments
Index
Bottom of Unit
Models and
Features
Upper Unit
Components
Front
Components
Left Side
Components
Right Side
Components
Bottom of
Unit
Rear
Connectors
Multi-media
Expansion
Unit
Power
Management
for Windows
98
1
Battery Latches
2
Real-time Clock Battery
3
Bottom of fan (Fan
removable from inside
only)
4
Speaker
5
Modem Compartment
6
220-pin Docking Connector