HP Pro 3005 Maintenance & Service Guide: HP Pro 3005/3015/3085 Business PC - Page 41
Access Panel, Removing the Computer Access Panel
 |
View all HP Pro 3005 manuals
Add to My Manuals
Save this manual to your list of manuals |
Page 41 highlights
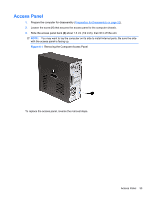
Access Panel 1. Prepare the computer for disassembly (Preparation for Disassembly on page 32). 2. Loosen the screw (1) that secures the access panel to the computer chassis. 3. Slide the access panel back (2) about 1.3 cm (1/2 inch), then lift it off the unit. NOTE: You may want to lay the computer on its side to install internal parts. Be sure the side with the access panel is facing up. Figure 6-1 Removing the Computer Access Panel To replace the access panel, reverse the removal steps. Access Panel 33
-
 1
1 -
2
-
3
-
4
-
5
-
6
-
7
-
8
-
9
-
10
-
11
-
12
-
13
-
14
-
15
-
16
-
17
-
18
-
19
-
20
-
21
-
22
-
23
-
24
-
25
-
26
-
27
-
28
-
29
-
30
-
31
-
32
-
33
-
34
-
35
-
 36
36 -
 37
37 -
 38
38 -
 39
39 -
 40
40 -
 41
41 -
 42
42 -
 43
43 -
 44
44 -
 45
45 -
 46
46 -
47
-
48
-
49
-
50
-
51
-
52
-
53
-
54
-
55
-
56
-
57
-
58
-
59
-
60
-
61
-
62
-
63
-
64
-
65
-
66
-
67
-
68
-
69
-
70
-
71
-
72
-
73
-
74
-
75
-
76
-
77
-
78
-
79
-
80
-
81
-
82
-
83
-
84
-
85
-
86
-
87
-
88
-
89
-
90
-
91
-
92
-
93
-
94
-
95
-
96
-
97
-
98
-
99
-
100
-
101
-
102
-
103
-
104
-
105
-
106
-
107
-
108
-
109
-
110
-
111
-
112
-
113
-
114
-
115
-
116
-
117
-
118
-
119
-
120
-
121
-
122
-
123
-
124
-
125
-
126
-
127
-
128
-
129
-
130
-
131
-
132
-
133
-
134
-
135
-
136
-
137
-
138
-
139
-
140
 |
 |
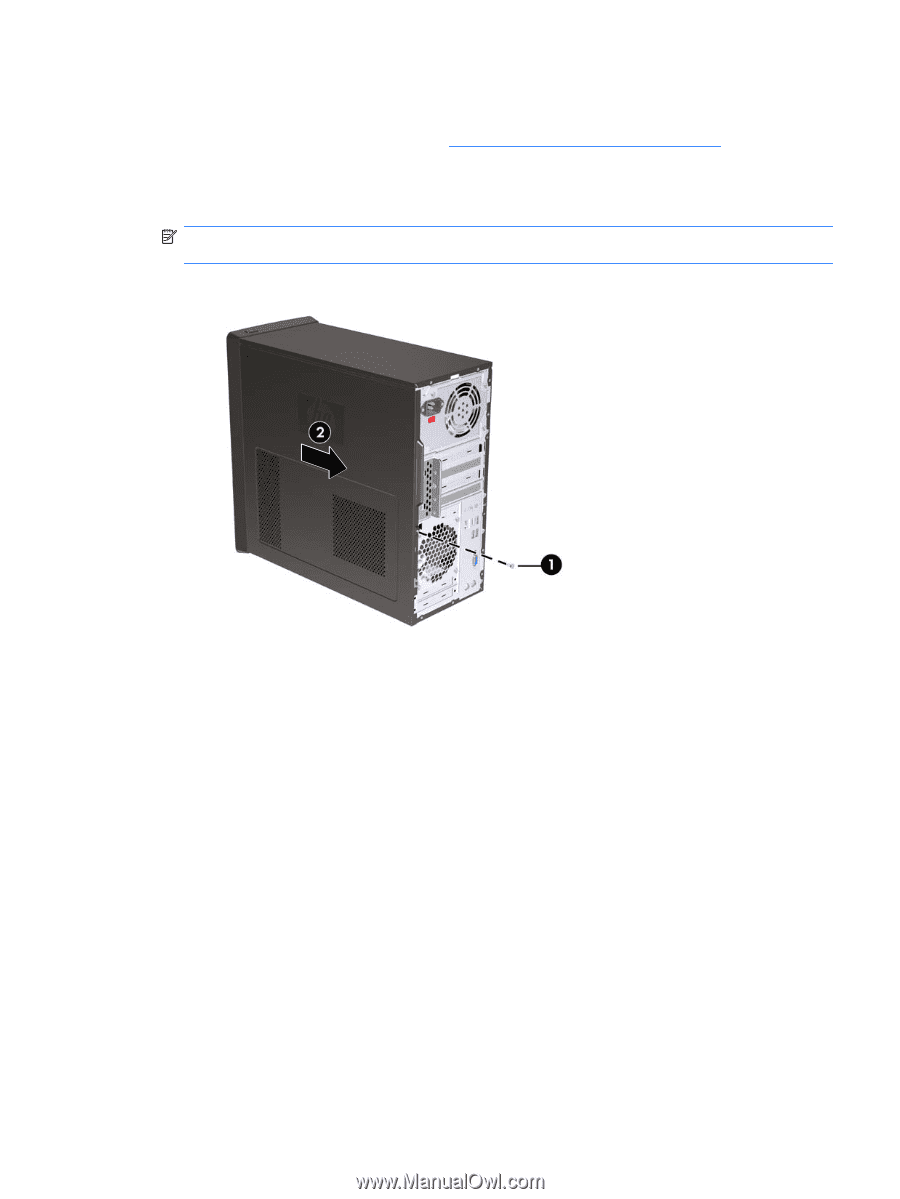
Access Panel
1.
Prepare the computer for disassembly (
Preparation for Disassembly
on page
32
).
2.
Loosen the screw
(1)
that secures the access panel to the computer chassis.
3.
Slide the access panel back
(2)
about 1.3 cm (1/2 inch), then lift it off the unit.
NOTE:
You may want to lay the computer on its side to install internal parts. Be sure the side
with the access panel is facing up.
Figure 6-1
Removing the Computer Access Panel
To replace the access panel, reverse the removal steps.
Access Panel
33