HP Pro c640 G2 Chromebook Maintenance and Service Guide - Page 49
that secure the bezel to the display., Remove the three Phillips M2.0 × 3.0 screws
 |
View all HP Pro c640 G2 Chromebook manuals
Add to My Manuals
Save this manual to your list of manuals |
Page 49 highlights
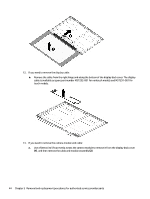
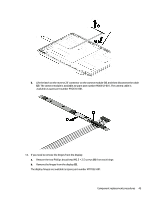
5. Remove the camera cable and one antenna cable from their routing at the top of the chassis (6). 6. Remove the four Phillips M2.5 × 4.5 screws (1) that secure the display to the computer. 7. Open the computer to open the hinges (2). 8. Separate the computer from the display (3). 9. If you need to replace display assembly subcomponents: a. Remove the three Phillips M2.0 × 3.0 screws (1) that secure the bezel to the display. b. Slide a flat tool (2) under each side of the bezel to remove it (3). The bezel is available as spare part number M59381-001. Component replacement procedures 41
-
 1
1 -
2
-
3
-
4
-
5
-
6
-
7
-
8
-
9
-
10
-
11
-
12
-
13
-
14
-
15
-
16
-
17
-
18
-
19
-
20
-
21
-
22
-
23
-
24
-
25
-
26
-
27
-
28
-
29
-
30
-
31
-
32
-
33
-
34
-
35
-
36
-
37
-
38
-
39
-
40
-
41
-
42
-
43
-
 44
44 -
 45
45 -
 46
46 -
 47
47 -
 48
48 -
 49
49 -
 50
50 -
 51
51 -
 52
52 -
 53
53 -
 54
54 -
55
-
56
-
57
-
58
-
59
-
60
-
61
-
62
-
63
-
64
-
65
-
66
-
67
-
68
-
69
-
70
-
71
-
72
 |
 |

5.
Remove the camera cable and one antenna cable from their routing at the top of the chassis
(6)
.
6.
Remove the four Phillips M2.5 × 4.5 screws
(1)
that secure the display to the computer.
7.
Open the computer to open the hinges
(2)
.
8.
Separate the computer from the display
(3)
.
9.
If you need to replace display assembly subcomponents:
a.
Remove the three Phillips M2.0 × 3.0 screws
(1)
that secure the bezel to the display.
b.
Slide a flat tool
(2)
under each side of the bezel to remove it
(3)
.
The bezel is available as spare part number M59381-001.
Component replacement procedures
41