HP ProLiant DL388e HP ProLiant Gen8 Troubleshooting Guide Volume I: Troublesho - Page 16
DIMM handling guidelines
 |
View all HP ProLiant DL388e manuals
Add to My Manuals
Save this manual to your list of manuals |
Page 16 highlights
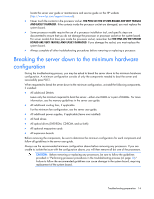
• Subscription services: HP offers a subscription service that can provide notification of firmware updates. For more information, see "Subscription services (on page 74)." For more information on updating firmware, see "Keeping the system current (on page 71)." If updating a server with a TPM installed, see "Server updates with an HP Trusted Platform Module and BitLocker enabled (on page 16)." Server updates with an HP Trusted Platform Module and BitLocker enabled When a TPM is installed and enabled in RBSU, and when the Microsoft Windows BitLocker Drive Encryption feature is enabled, always disable BitLocker before performing any of the following procedures: • Restarting the computer for maintenance without a PIN or startup key • Updating firmware (on page 59) • Upgrading critical early boot components • Upgrading the system board to replace or remove the TPM • Disabling or clearing the TPM • Moving a BitLocker-protected drive to another server • Adding an optional PCI device, such as a storage controller or network adapter DIMM handling guidelines CAUTION: Failure to properly handle DIMMs can cause damage to DIMM components and the system board connector. When handling a DIMM, observe the following guidelines: • Avoid electrostatic discharge (on page 11). • Always hold DIMMs by the side edges only. • Avoid touching the connectors on the bottom of the DIMM. • Never wrap your fingers around a DIMM. • Avoid touching the components on the sides of the DIMM. • Never bend or flex the DIMM. When installing a DIMM, observe the following guidelines: • Before seating the DIMM, open the DIMM slot and align the DIMM with the slot. Some servers require the use of a DIMM tool to open the slots. For more information, see the server user guide. • To align and seat the DIMM, use two fingers to hold the DIMM along the side edges. • To seat the DIMM, use two fingers to apply gentle pressure along the top of the DIMM. For more information, see the HP website (http://h20000.www2.hp.com/bizsupport/TechSupport/Document.jsp?lang=en&cc=us&objectID=c008 68283&jumpid=reg_R1002_USEN). Common problem resolution 16
-
 1
1 -
2
-
3
-
4
-
5
-
6
-
7
-
8
-
9
-
10
-
 11
11 -
 12
12 -
 13
13 -
 14
14 -
 15
15 -
 16
16 -
 17
17 -
 18
18 -
 19
19 -
 20
20 -
 21
21 -
22
-
23
-
24
-
25
-
26
-
27
-
28
-
29
-
30
-
31
-
32
-
33
-
34
-
35
-
36
-
37
-
38
-
39
-
40
-
41
-
42
-
43
-
44
-
45
-
46
-
47
-
48
-
49
-
50
-
51
-
52
-
53
-
54
-
55
-
56
-
57
-
58
-
59
-
60
-
61
-
62
-
63
-
64
-
65
-
66
-
67
-
68
-
69
-
70
-
71
-
72
-
73
-
74
-
75
-
76
-
77
-
78
-
79
-
80
-
81
-
82
-
83
-
84
-
85
-
86
-
87
-
88
-
89
-
90
-
91
-
92
-
93
-
94
-
95
-
96
-
97
 |
 |