HP ProLiant DL388e HP ProLiant Gen8 Troubleshooting Guide Volume I: Troublesho - Page 37
General hardware problems
 |
View all HP ProLiant DL388e manuals
Add to My Manuals
Save this manual to your list of manuals |
Page 37 highlights
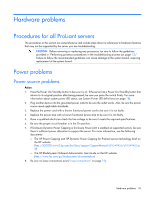
8. If the UPS sleep mode is initiated, disable sleep mode for proper operation. The UPS sleep mode can be turned off through the configuration mode on the front panel. 9. Change the battery to be sure damage was not caused by excessive heat, particularly if a recent air conditioning outage has occurred. NOTE: The optimal operating temperature for UPS batteries is 25°C (77°F). For approximately every 8°C to 10°C (16°F to 18°F) average increase in ambient temperature above the optimal temperature, battery life is reduced by 50 percent. Low battery warning is displayed Action: 1. Plug the UPS into an AC grounded outlet for at least 24 hours to charge the batteries, and then test the batteries. Replace the batteries if necessary. 2. Be sure the alarm is set appropriately by changing the amount of time given before a low battery warning. Refer to the UPS documentation for instructions. One or more LEDs on the UPS is red Action: Refer to the UPS documentation for instructions regarding the specific LED to determine the cause of the error. General hardware problems Problems with new hardware Action: 1. Be sure the hardware being installed is a supported option on the server. For information on supported hardware, see the server documentation on the HP website (http://www.hp.com/support). If necessary, remove unsupported hardware. 2. To be sure the problem is not caused by a change to the hardware release, see the release notes included with the hardware. If no documentation is available, see the HP website (http://www.hp.com/support). 3. Be sure the new hardware is installed properly. To be sure all requirements are met, see the device, server, and OS documentation. Common problems include: o Incomplete population of a memory bank o Connection of the data cable, but not the power cable, of a new device 4. Be sure no memory, I/O, or interrupt conflicts exist. 5. Be sure no loose connections (on page 15) exist. 6. Be sure all cables are connected to the correct locations and are the correct lengths. For more information, see the server documentation on the HP website (http://www.hp.com/support). 7. Be sure other components were not accidentally unseated during the installation of the new hardware component. Hardware problems 37
-
 1
1 -
2
-
3
-
4
-
5
-
6
-
7
-
8
-
9
-
10
-
11
-
12
-
13
-
14
-
15
-
16
-
17
-
18
-
19
-
20
-
21
-
22
-
23
-
24
-
25
-
26
-
27
-
28
-
29
-
30
-
31
-
 32
32 -
 33
33 -
 34
34 -
 35
35 -
 36
36 -
 37
37 -
 38
38 -
 39
39 -
 40
40 -
 41
41 -
 42
42 -
43
-
44
-
45
-
46
-
47
-
48
-
49
-
50
-
51
-
52
-
53
-
54
-
55
-
56
-
57
-
58
-
59
-
60
-
61
-
62
-
63
-
64
-
65
-
66
-
67
-
68
-
69
-
70
-
71
-
72
-
73
-
74
-
75
-
76
-
77
-
78
-
79
-
80
-
81
-
82
-
83
-
84
-
85
-
86
-
87
-
88
-
89
-
90
-
91
-
92
-
93
-
94
-
95
-
96
-
97
 |
 |