HP Q1581A HP DDS/DAT drives UNIX, Linux and OpenVMS configuration guide (DW049 - Page 17
Configuring an autoloader, Class, Reinstall Device, Files, Reinstall, Refresh
 |
UPC - 882780612716
View all HP Q1581A manuals
Add to My Manuals
Save this manual to your list of manuals |
Page 17 highlights
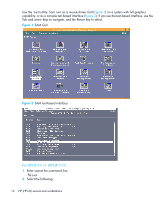
3. Select tape from the Class drop down box on the HP-UX Peripheral Device Tool page. Select the tape device (radio button) requiring device files from the resulting list. If device files are not already present this will be indicated under the Properties header (see Figure 5)1. Figure 5 Selecting a tape device to create its device files (Agile View) 4. From the right-hand panel on the HP-UX Peripheral Device Tool page, click on Reinstall Device Files. At the next page, click the Reinstall button. When the browser returns to the HP-UX Peripheral Device Tool page, click the Refresh button one or more times until the list of device files appears under the Properties header. Configuring an autoloader 1. Reboot the system with the autoloader attached. 2. Run ioscan -funC autoch to find the device files for the autoloader. If there are no device files listed, proceed as follows: 3. Create /dev/rac if it does not exist. 4. Run ioscan -funC tape to find the tape device file. 5. Execute: ls -al /dev/rmt/ This will return an output similar to: 2 bin bin 205 0x0450c0 This example tells you that the card number is 4 and the target number 5. 6. Run mknod to create the device files: mknod /dev/rac/ctd c 203 0x000 where: is the card number is the target number is the LUN 1. Depending on how SMH was last used the HP-UX Peripheral Device Tool page will display either the Agile View or the Legacy View as referenced in the Introduction to this chapter (page 9). To switch between these views use the Toggle Global Device View link on the right hand side of the HP-UX Peripheral Device Tool page. In this chapter, the Agile View is assumed. The process is similar for the Legacy View. HP Evolution II DDS/DAT drives: UNIX, Linux and OpenVMS configuration guide 17
-
 1
1 -
2
-
3
-
4
-
5
-
6
-
7
-
8
-
9
-
10
-
11
-
 12
12 -
 13
13 -
 14
14 -
 15
15 -
 16
16 -
 17
17 -
 18
18 -
 19
19 -
 20
20 -
 21
21 -
 22
22 -
23
-
24
-
25
-
26
-
27
-
28
-
29
-
30
-
31
-
32
-
33
-
34
-
35
-
36
-
37
-
38
-
39
-
40
-
41
-
42
 |
 |
