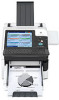
HP Scanjet Enterprise 7000n HP Scanjet 7000n Series - User Guide - Page 38
Con other digital sending settings, Save to Network Folder Setup
 |
View all HP Scanjet Enterprise 7000n manuals
Add to My Manuals
Save this manual to your list of manuals |
Page 38 highlights
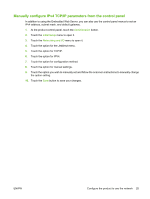
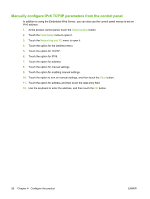
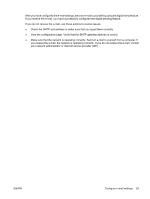
Configure other digital sending settings Use the Embedded Web Server (EWS) to configure e-mail settings and additional features such as: ● E-mail ● Digital fax ● Save to network folder ● Save to USB ● Quick sets ● Address books ● Authentication for Windows, LDAP, Novell, and local access codes When the product is connected to the network, the EWS is automatically available. To start the EWS, open a web browser on a computer and type the IP address of the product. To find the IP address or host name, touch the Network Address button on the Home screen. In addition to the features listed in this section, you can also set up workflows using third-party software or HP Digital Sending Software that is compatible with the product. For information about setting up these workflows and using them, see the documentation that came with these products. Configure digital fax settings 1. Click the Fax tab. 2. On the left navigation menu, select the Fax Send Setup entry. 3. Select Enable Fax Send and then select either the LAN Fax Service or Internet Fax Service entry (depending on your network configuration). 4. Follow the onscreen instructions to complete the required fields, and then click the Apply button. 5. To add fax numbers to the Speed Dial List, click the Speed Dials entry in the left navigation pane, click a speed dial code and then click the Add button, follow the onscreen instructions, and then click the Apply button. Save to Network Folder Setup Before configuring network folders, set up shared folders following the instructions for your network operating system. 1. Click the Scan/Digital Send tab. 2. On the left navigation menu, click the Save to Network Folder Setup entry. 3. Select the Enable Save to Network Folder checkbox. 4. Set the default settings you want for all folders and then click the Apply button. 5. To specify network folders to which to save documents, click the Add button in the Quick Sets area and follow the onscreen instructions. Configure USB storage device settings 1. Click the Scan/Digital Send tab. 2. On the left navigation menu, click the Save to USB Setup entry. 30 Chapter 4 Configure the product ENWW
-
 1
1 -
2
-
3
-
4
-
5
-
6
-
7
-
8
-
9
-
10
-
11
-
12
-
13
-
14
-
15
-
16
-
17
-
18
-
19
-
20
-
21
-
22
-
23
-
24
-
25
-
26
-
27
-
28
-
29
-
30
-
31
-
32
-
 33
33 -
 34
34 -
 35
35 -
 36
36 -
 37
37 -
 38
38 -
 39
39 -
 40
40 -
 41
41 -
 42
42 -
 43
43 -
44
-
45
-
46
-
47
-
48
-
49
-
50
-
51
-
52
-
53
-
54
-
55
-
56
-
57
-
58
-
59
-
60
-
61
-
62
-
63
-
64
-
65
-
66
-
67
-
68
-
69
-
70
-
71
-
72
-
73
-
74
-
75
-
76
-
77
-
78
-
79
-
80
-
81
-
82
-
83
-
84
-
85
-
86
-
87
-
88
-
89
-
90
-
91
-
92
-
93
-
94
-
95
-
96
-
97
-
98
-
99
-
100
-
101
-
102
-
103
-
104
-
105
-
106
-
107
-
108
-
109
-
110
-
111
-
112
-
113
-
114
-
115
-
116
-
117
-
118
-
119
-
120
-
121
-
122
-
123
-
124
-
125
-
126
-
127
-
128
-
129
-
130
 |
 |
