HP Scitex FB7500 User Instructions Replacing a Print Head - Page 10
Print the Head Signature file.
 |
View all HP Scitex FB7500 manuals
Add to My Manuals
Save this manual to your list of manuals |
Page 10 highlights
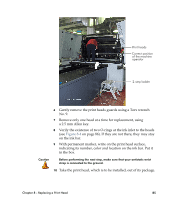
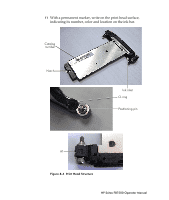
28 Power up the machine and start the machine application. 29 Perform the maintenance cycle at least twice. 30 Print the Head Signature file. If the new print head does not appear on the printout, carefully press on its PIC board to ensure a proper connection between the 26-pin connector of the print head and the connector on the PIC board. If it also does not help, do the following: • Gently release the 10 screws on the PIC board, pulled it out and disconnect all the print heads connected to it. • After that, place the PIC board back. • Verify that all the print heads are properly connected by gently pressing each connector on the PIC board. • Turn the screw one by one 2 turns only. Note Do not tighten the first screw leaving the other screw open. This may course bending of the PIC board and damage to the pins of the connectors. • Repeat this until all the screws are tightened. 31 Perform the Trimming procedure. For detailed instructions refer to ACT User Guide supplied on the ACT DVD in the HP Scitex FB7500 Documentation Kit. HP Scitex FB7500 Operator Manual
-
 1
1 -
2
-
3
-
4
-
 5
5 -
 6
6 -
 7
7 -
 8
8 -
 9
9 -
 10
10
 |
 |
