HP Scitex FB7500 User Instructions Replacing a Print Head - Page 5
on the ink bar.
 |
View all HP Scitex FB7500 manuals
Add to My Manuals
Save this manual to your list of manuals |
Page 5 highlights
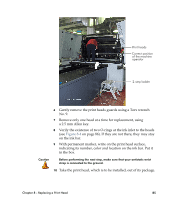
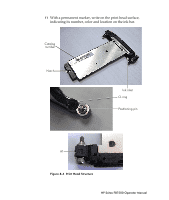
Print heads Correct position of the machine operator 2-step ladder 6 Gently remove the print heads guards using a Torx wrench No. 9. 7 Remove only one head at a time for replacement, using a 2.5 mm Allen key. 8 Verify the existence of two O-rings at the ink inlet to the heads (see Figure 8-4 on page 86). If they are not there, they may stay on the ink bar. 9 With permanent marker, write on the print head surface, indicating its number, color and location on the ink bar. Put it in the box. Caution Before performing the next step, make sure that your antistatic wrist strap is connected to the ground. 10 Take the print head, which is to be installed, out of its package. Chapter 8 - Replacing a Print Head 85
-
 1
1 -
 2
2 -
 3
3 -
 4
4 -
 5
5 -
 6
6 -
 7
7 -
 8
8 -
 9
9 -
 10
10
 |
 |

Chapter 8 - Replacing a Print Head
85
6
Gently remove the print heads guards using a Torx wrench
No. 9.
7
Remove only one head at a time for replacement, using
a 2.5 mm Allen key.
8
Verify the existence of two O-rings at the ink inlet to the heads
(see
Figure 8-4
on page 86). If they are not there, they may stay
on the ink bar.
9
With permanent marker, write on the print head surface,
indicating its number, color and location on the ink bar. Put it
in the box.
Caution
Before performing the next step, make sure that your antistatic wrist
strap is connected to the ground.
10
Take the print head, which is to be installed, out of its package.
2-step ladder
Print heads
Correct position
of the machine
operator