HP Scitex FB7500 User Instructions Replacing a Print Head - Page 7
Screw out the two screws of the print head until they stand out
 |
View all HP Scitex FB7500 manuals
Add to My Manuals
Save this manual to your list of manuals |
Page 7 highlights
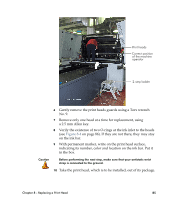
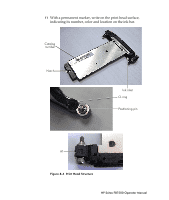
12 Verify that the two O-rings are on the ink inputs. 13 Visually check that the registration pins are clean. 14 Verify that the slot in the ink bar is clean. Slot for print head Ink feeding holes Print head inserted into slot Figure 8-5 Ink Bar 15 Screw out the two screws of the print head until they stand out steadily, as shown below. o Figure 8-6 Screws Chapter 8 - Replacing a Print Head 87
-
 1
1 -
 2
2 -
 3
3 -
 4
4 -
 5
5 -
 6
6 -
 7
7 -
 8
8 -
 9
9 -
 10
10
 |
 |

Chapter 8 - Replacing a Print Head
87
12
Verify that the two O-rings are on the ink inputs.
13
Visually check that the registration pins are clean.
14
Verify that the slot in the ink bar is clean.
Figure 8-5
Ink Bar
15
Screw out the two screws of the print head until they stand out
steadily, as shown below.
o
Figure 8-6
Screws
Slot for print
head
Ink feeding
holes
inserted into
slot
Print head