HP Spectre XT Ultrabook 13-2100 HP SpectreXT Maintenance and Service Guide - Page 38
To remove the bottom enclosure, use a thin, non-conductive tool such as the HP Tool
 |
View all HP Spectre XT Ultrabook 13-2100 manuals
Add to My Manuals
Save this manual to your list of manuals |
Page 38 highlights
2. Remove the 6 remaining Phillips PM 5.5 millimeter screws (2) from the back and the middle of the base enclosure. 3. Separate the bottom enclosure from the unit at the rear edge and remove the bottom enclosure. NOTE: To remove the bottom enclosure, use a thin, non-conductive tool such as the HP Tool Shroud separator. This tool is available on the HP website. 30 Chapter 4 Removal and replacement procedures
-
 1
1 -
2
-
3
-
4
-
5
-
6
-
7
-
8
-
9
-
10
-
11
-
12
-
13
-
14
-
15
-
16
-
17
-
18
-
19
-
20
-
21
-
22
-
23
-
24
-
25
-
26
-
27
-
28
-
29
-
30
-
31
-
32
-
 33
33 -
 34
34 -
 35
35 -
 36
36 -
 37
37 -
 38
38 -
 39
39 -
 40
40 -
 41
41 -
 42
42 -
 43
43 -
44
-
45
-
46
-
47
-
48
-
49
-
50
-
51
-
52
-
53
-
54
-
55
-
56
-
57
-
58
-
59
-
60
-
61
-
62
-
63
-
64
-
65
-
66
-
67
-
68
-
69
-
70
-
71
-
72
-
73
-
74
-
75
-
76
-
77
-
78
-
79
-
80
-
81
-
82
-
83
-
84
-
85
-
86
-
87
-
88
-
89
-
90
 |
 |
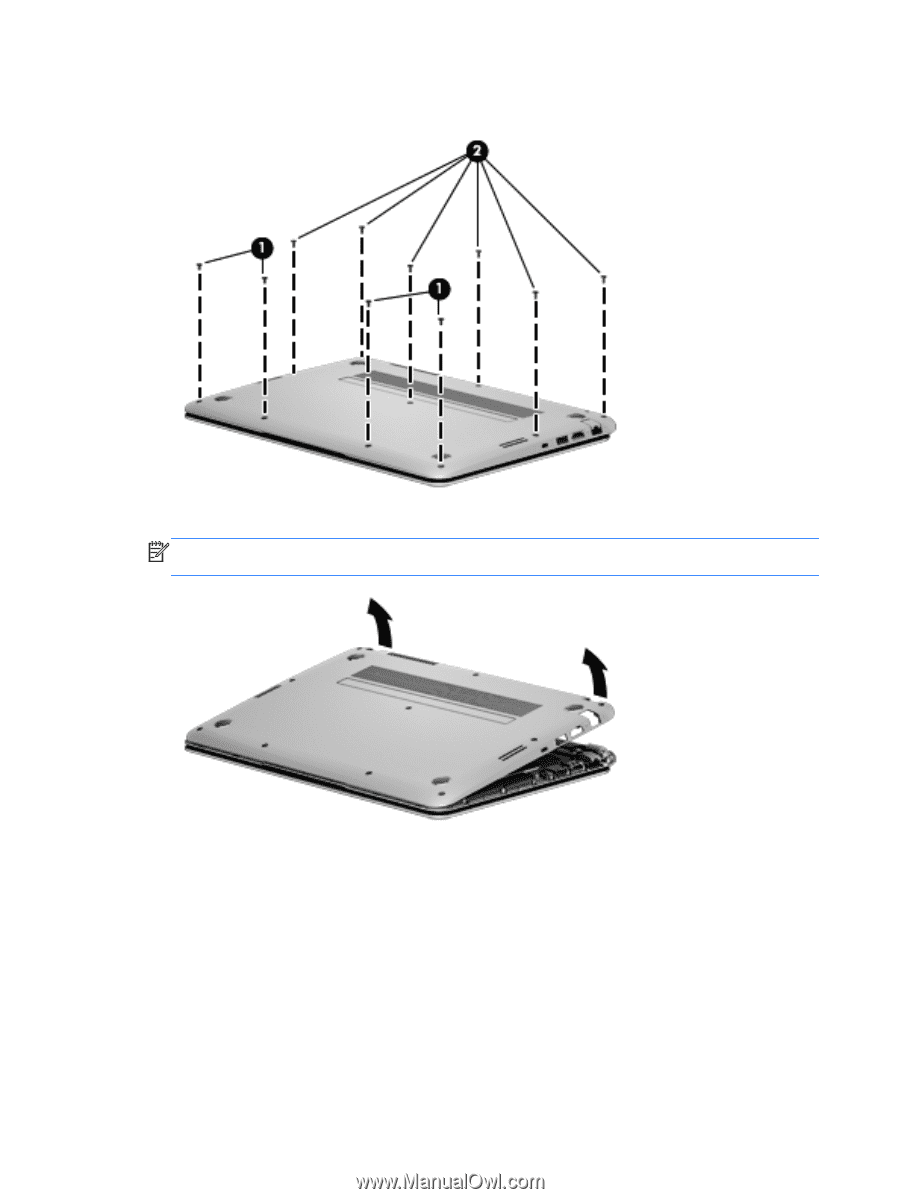
2.
Remove the 6 remaining Phillips PM 5.5 millimeter screws
(2)
from the back and the middle of
the base enclosure.
3.
Separate the bottom enclosure from the unit at the rear edge and remove the bottom enclosure.
NOTE:
To remove the bottom enclosure, use a thin, non-conductive tool such as the HP Tool
Shroud separator. This tool is available on the HP website.
30
Chapter 4
Removal and replacement procedures