HP StorageWorks XP12000 HP StorageWorks XP Disk Array Configuration Guide: IBM - Page 24
Mounting and verifying the file systems, The Command Status screen appears.
 |
View all HP StorageWorks XP12000 manuals
Add to My Manuals
Save this manual to your list of manuals |
Page 24 highlights
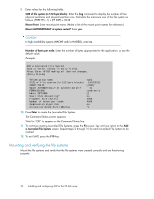
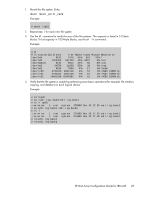
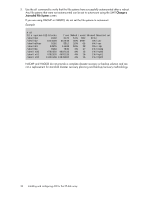
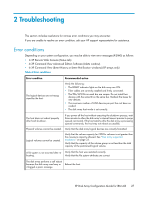
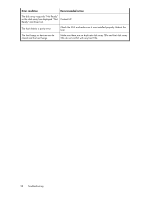
9. Enter values for the following fields: SIZE of file system (in 512-byte blocks). Enter the lsvg command to display the number of free physical partitions and physical partition size. Calculate the maximum size of the file system as follows: (FREE PPs - 1) x (PP SIZE) x 2048 Mount Point: Enter mount point name. (Make a list of the mount point names for reference.) Mount AUTOMATICALLY at system restart? Enter yes. CAUTION: In high availability systems (HACMP and/or HAGEO), enter no. Number of bytes per node. Enter the number of bytes appropriate for the application, or use the default value. Example Add a Journaled File System Type or select values in entry fields. Press Enter AFTER making all desired changes. [Entry Fields] Volume group name SIZE of file system (in 512-byte blocks) MOUNT POINT Mount AUTOMATICALLY at system restart? PERMISSIONS Mount OPTIONS Start Disk Accounting? Fragment Size (bytes) Number of bytes per inode Compression algorithm Allocation Group Size (Mbytes) vg01 [4792320] [VG01] no read/write [] no 4096 4096 no *1 10. Press Enter to create the Journaled File System. The Command Status screen appears. Wait for "OK" to appear on the Command Status line. 11. To continue creating Journaled File Systems, press the F3 screen. key until you return to the Add a Journaled File System screen. Repeat steps 2 through 10 for each Journaled File System to be created. 12. To exit SMIT, press the F10 key. Mounting and verifying the file systems Mount the file systems and verify that the file systems were created correctly and are functioning properly. 24 Installing and configuring AIX for the XP disk array
-
 1
1 -
2
-
3
-
4
-
5
-
6
-
7
-
8
-
9
-
10
-
11
-
12
-
13
-
14
-
15
-
16
-
17
-
18
-
 19
19 -
 20
20 -
 21
21 -
 22
22 -
 23
23 -
 24
24 -
 25
25 -
 26
26 -
 27
27 -
 28
28 -
 29
29 -
30
-
31
-
32
-
33
-
34
-
35
-
36
-
37
-
38
-
39
-
40
-
41
-
42
-
43
-
44
-
45
-
46
-
47
-
48
-
49
-
50
-
51
-
52
-
53
-
54
 |
 |
