HP T1120ps HP Designjet T1120 Printer Assembly Instructions: English - Page 11
No gap should be left between, stop and paper - ink
 |
UPC - 884420611936
View all HP T1120ps manuals
Add to My Manuals
Save this manual to your list of manuals |
Page 11 highlights
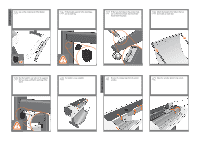
Align the print- 75 If the blue removable stop is on the spindle, remove it. Put the roll onto the spindle, making sure to put it on the right way round: the leading edge of the paper should go into the printer from the top of the roll. Add the removable stop to the spindle to keep the roll in place. 76 Push the removable stop towards the roll as far as it will go. No gap should be left between stop and paper. 77 Replace the spindle into the printer, left end first, with the fixed stop on the left and the blue removable stop on the right. 78 Feed the leading edge of the paper into the printer until the printer takes hold of it. Then move to the front of the printer. 79 The front panel will ask whether you are loading roll or sheet paper. The printer will proceed to align the printheads. This process involves printing, and therefore needs to use some paper. 80 The front panel will display a series of messages showing the progress of the printhead alignment. There is no need to take any action until the alignment has finished, when you will see the message shown below. Press the OK key. 81 You can now, or at some later time, colorcalibrate the paper type that you intend to use in the printer. Color calibration is recommended for accurate color printing. It can be started from the Printer Utility program installed as part of your printer software, or from the front panel's Image Quality Maintenance menu. 82 1- View ink levels 2- View loaded paper 3- Unload paper 4- Form feed and cut 5- Back 6- Menu 7- Power 8- cancel 9- OK 2 1 98 4 3 56 7
-
 1
1 -
2
-
3
-
4
-
5
-
 6
6 -
 7
7 -
 8
8 -
 9
9 -
 10
10 -
 11
11 -
 12
12
 |
 |
