HP T1120ps HP Designjet T1120 Printer Assembly Instructions: English - Page 8
Install the ink cartridges
 |
UPC - 884420611936
View all HP T1120ps manuals
Add to My Manuals
Save this manual to your list of manuals |
Page 8 highlights
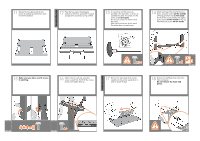
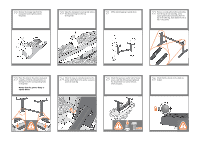
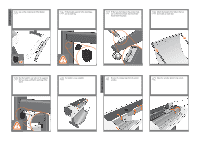
Install the ink cartridges 51 Connect the supplied network cable or a certified USB 2.0 cable to the appropriate socket on the rear right of the printer, and secure the cable with the clip provided, to prevent accidental unplugging. 52 Connect the power cable to the printer's power socket. 53 Switch on power to the printer using the switch just above the power socket. Remove the plastic film covering the window and the plastic film covering the front panel (LCD display). 54 On the front panel, the HP logo appears. Please wait a while. You will then be prompted to select the language of the printer. 55 The printer checks for the presence of ink cartridges. On finding none, it prompts you to install the ink cartridges. 56 Open the cover on the left-hand side of the printer. 57 Insert the ink cartridges one by one. Each cartridge is marked with its own color, and should be inserted only into the slot of the same color. Avoid touching pins, leads or circuits. 58 The cartridges must be inserted the right way around: the ink outlet in the catridge should meet the ink inlet in the slot. Push the cartridge into the slot until it clicks into place. The printer beeps whenever a cartridge is successfully inserted.
-
 1
1 -
2
-
 3
3 -
 4
4 -
 5
5 -
 6
6 -
 7
7 -
 8
8 -
 9
9 -
 10
10 -
 11
11 -
 12
12
 |
 |
