HP TouchSmart IQ840 Upgrading and Servicing Guide - Page 25
replaced properly, it will be flush with the larger back cover.
 |
View all HP TouchSmart IQ840 manuals
Add to My Manuals
Save this manual to your list of manuals |
Page 25 highlights
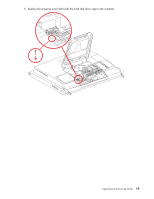
7 Replace the hard disk drive/memory cover by lowering it into place, and sliding it so the slots on the cover fit into the grooves under the computer stand. The cover snaps into place with a click as the side tabs engage in the computer. When the cover is replaced properly, it will be flush with the larger back cover. 8 Replace the screw that secures the hard disk drive cage to the chassis. Upgrading and Servicing Guide 21
-
 1
1 -
2
-
3
-
4
-
5
-
6
-
7
-
8
-
9
-
10
-
11
-
12
-
13
-
14
-
15
-
16
-
17
-
18
-
19
-
 20
20 -
 21
21 -
 22
22 -
 23
23 -
 24
24 -
 25
25 -
 26
26 -
 27
27 -
 28
28
 |
 |

Upgrading and Servicing Guide
21
7
Replace the hard disk drive/memory cover by lowering it into place, and sliding it so the slots on the
cover fit into the grooves under the computer stand.
The cover snaps into place with a click as the side tabs engage in the computer. When the cover is
replaced properly, it will be flush with the larger back cover.
8
Replace the screw that secures the hard disk drive cage to the chassis.