HP Xw25p Rapid Deployment Pack Windows Edition User Guide 3.70 - Page 6
Configuring image installs, Configuring Windows Sysprep jobs
 |
View all HP Xw25p manuals
Add to My Manuals
Save this manual to your list of manuals |
Page 6 highlights
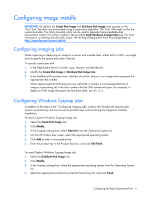
Configuring image installs IMPORTANT: By default, the Create Disk Image and Distribute Disk Image tasks operate on the "first" disk. The disks are enumerated using a proprietary algorithm. The "first" disk might not be the system boot disk. The Altiris showdisk utility can be used to generate human-readable disk enumeration output. This utility is called in the provided Read Hardware Configuration job. For more information on reading the showdisk output, see the Rapid Deployment Pack Knowledge Base at http://www.hp.com/servers/rdp/kb. Configuring imaging jobs When capturing or deploying an image to a server with multiple disks, either DAS or SAN, you might have to specify the system boot disk in the job. To specify a particular disk: 1. In the Deployment Server Console, copy, rename, and edit the job. 2. Modify the Create Disk Image or Distribute Disk Image task. 3. In the Additional Parameteres box, add the -dx switch, where x is an integer that represents the appropriate disk number. When deploying Red Hat Enterprise Linux with LVM, x must be a comma-separated list of integers representing all of the disk numbers that the LVM volume will span. For example, to deploy an LVM image that spans the first three disks, use -d1, 2, 3. Configuring Windows Sysprep jobs In addition to the steps in the "Configuring imaging jobs" section, the Windows® Sysprep jobs require a product key and cannot use the product keys entered during the Integration Module installation. For each Capture Windows Sysprep Image job: 1. Select the Create Disk Image task. 2. Click Modify. 3. In the Sysprep settings box, select Add new from the Operating System list. 4. On the OS Product Key screen, select the appropriate operating system. 5. Click Add to enter a new product key. 6. Enter the product key in the Product Key box, and click OK>Finish. For each Deploy Windows Sysprep Image job: 1. Select the Distribute Disk Image task. 2. Click Modify. 3. In the Sysprep settings box, select the appropriate operating system from the Operating System list. 4. Select the appropriate product key from the Product key list, and click Finish. Configuring the Rapid Deployment Pack 6
-
 1
1 -
 2
2 -
 3
3 -
 4
4 -
 5
5 -
 6
6 -
 7
7 -
 8
8 -
 9
9 -
 10
10 -
 11
11 -
 12
12 -
13
-
14
-
15
-
16
-
17
-
18
-
19
-
20
-
21
-
22
-
23
-
24
-
25
-
26
-
27
-
28
-
29
-
30
-
31
-
32
-
33
-
34
-
35
-
36
-
37
 |
 |
