HP Xw6400 HP xw Workstation series - Sliding rack mount kit installation - Page 10
Step 4—Mounting into a rack, Using the mounting aid
 |
UPC - 882780645493
View all HP Xw6400 manuals
Add to My Manuals
Save this manual to your list of manuals |
Page 10 highlights
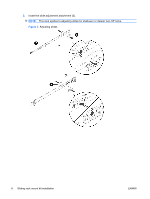
Step 4-Mounting into a rack 1. Insert the inner rails into the outer rails. 2. Push the workstation to slide it completely into the rack. You might need to release the latches on the slides. 3. Secure the workstation into the rack by tightening the thumb screws on the mounting flanges. NOTE: Two people are necessary to properly align and install the workstation and rails. Figure 8 Mounting into a rack Using the mounting aid 1. Place the mounting aid shown on the next page on the bottom of the rack (or on top of an already installed unit in a rack). 2. Align the circles with the rack holes to determine a 4U space. 3. The 4U space will be the top of the workstation after it is installed. 10 Sliding rack mount kit installation ENWW
-
 1
1 -
2
-
3
-
4
-
 5
5 -
 6
6 -
 7
7 -
 8
8 -
 9
9 -
 10
10 -
 11
11
 |
 |

Step 4—Mounting into a rack
1.
Insert the inner rails into the outer rails.
2.
Push the workstation to slide it completely into the rack. You might need to release the latches on
the slides.
3.
Secure the workstation into the rack by tightening the thumb screws on the mounting flanges.
NOTE:
Two people are necessary to properly align and install the workstation and rails.
Figure 8
Mounting into a rack
Using the mounting aid
1.
Place the mounting aid shown on the next page on the bottom of the rack (or on top of an already
installed unit in a rack).
2.
Align the circles with the rack holes to determine a 4U space.
3.
The 4U space will be the top of the workstation after it is installed.
10
Sliding rack mount kit installation
ENWW