HP Xw6400 HP xw Workstation series - Sliding rack mount kit installation - Page 5
Step 2—Installing rails and flanges, Step 3—Installing rails to the rack
 |
UPC - 882780645493
View all HP Xw6400 manuals
Add to My Manuals
Save this manual to your list of manuals |
Page 5 highlights
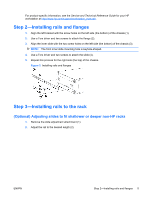
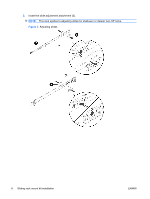
For product-specific information, see the Service and Technical Reference Guide for your HP workstation at http://www.hp.com/support/workstation_manuals. Step 2-Installing rails and flanges 1. Align the left bracket with the screw holes on the left side (the bottom) of the chassis (1). 2. Use a Torx driver and two screws to attach the flange (2). 3. Align the inner slide with the two screw holes on the left side (the bottom) of the chassis (3). NOTE: The front inner slide mounting hole is keyhole-shaped. 4. Use a Torx driver and two screws to attach the slide (4). 5. Repeat this process for the right side (the top) of the chassis. Figure 2 Installing rails and flanges Step 3-Installing rails to the rack (Optional) Adjusting slides to fit shallower or deeper non-HP racks 1. Remove the slide adjustment attachment (1). 2. Adjust the rail to the desired length (2). ENWW Step 2-Installing rails and flanges 5
-
 1
1 -
 2
2 -
 3
3 -
 4
4 -
 5
5 -
 6
6 -
 7
7 -
 8
8 -
 9
9 -
 10
10 -
 11
11
 |
 |
