HP Xw6400 HP xw Workstation series - Sliding rack mount kit installation - Page 4
Tools required, Round hole and square hole racks, Threaded hole racks
 |
UPC - 882780645493
View all HP Xw6400 manuals
Add to My Manuals
Save this manual to your list of manuals |
Page 4 highlights
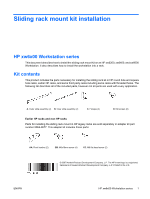
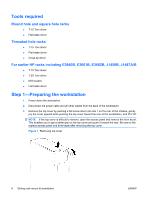
Tools required Round hole and square hole racks ● T-15 Torx driver ● Flat blade driver Threaded hole racks ● T-15 Torx driver ● Flat blade driver ● Cross-tip driver For earlier HP racks including E3660B, E3661B, E3662B, J1450B, J1487A/B ● T-15 Torx driver ● T-25 Torx driver ● M10 socket ● Flat blade driver Step 1-Preparing the workstation 1. Power down the workstation. 2. Disconnect the power cable and all other cables from the back of the workstation. 3. Remove the top cover by pushing a flat screw driver into slot 1 on the rear of the chassis, gently pry the cover upward while pushing the top cover toward the rear of the workstation, and lift it off. NOTE: If the top cover is difficult to remove, open the access panel and remove the front bezel. This enables you to get a better grip on the top cover and push it toward the rear. Be sure to the replace access panel and front bezel after removing the top cover. Figure 1 Removing top cover 4 Sliding rack mount kit installation ENWW
-
 1
1 -
 2
2 -
 3
3 -
 4
4 -
 5
5 -
 6
6 -
 7
7 -
 8
8 -
 9
9 -
 10
10 -
11
 |
 |
