HP Xw6400 HP xw Workstation series - Sliding rack mount kit installation - Page 9
Installing on earlier HP racks
 |
UPC - 882780645493
View all HP Xw6400 manuals
Add to My Manuals
Save this manual to your list of manuals |
Page 9 highlights
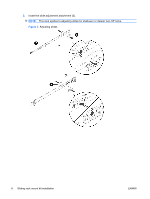
Installing on earlier HP racks NOTE: The parts for this procedure are available separately in adapter kit number 5064-9677. 1. Remove the rear mounting brackets from the outer slides (1). 2. Remove the front mounting brackets from the outer slides (2). Save the nuts for use in steps 5 and 6 below. 3. Extend the rails (3). Figure 6 Installing on earlier HP racks NOTE: This product must be mounted in the middle of a 4U space. Use the mounting aid at the end of this document to determine a 4U space and mark the center. 4. Attach the front bracket with the two M5x16 screws (4). 5. Attach the slide to the rear of the rack as shown using an M6 Flathead screw and a nut saved from step 2 (5). 6. Attach the slide to the front of the rack as shown using an M6 Flathead screw and a nut saved from step 2 (6). Figure 7 Attaching brackets ENWW Step 3-Installing rails to the rack 9
-
 1
1 -
2
-
3
-
 4
4 -
 5
5 -
 6
6 -
 7
7 -
 8
8 -
 9
9 -
 10
10 -
 11
11
 |
 |
