HP Xw9300 HP User Manual for the Integrated NVIDIA SATA RAID Array for Microso
HP Xw9300 - Workstation - 1 GB RAM Manual
 |
View all HP Xw9300 manuals
Add to My Manuals
Save this manual to your list of manuals |
HP Xw9300 manual content summary:
- HP Xw9300 | HP User Manual for the Integrated NVIDIA SATA RAID Array for Microso - Page 1
HP User Manual for the Integrated NVIDIA SATA RAID Array for Microsoft® Windows® XP Professional Integrated SATA RAID controller ...2 Setting Up a Non-Bootable NVIDIA RAID Array 2 Step 1-Enabling RAID option ...2 Step 2-Configuring RAID...3 Step 3-Initializing the disk array 4 Step 4-Obtaining - HP Xw9300 | HP User Manual for the Integrated NVIDIA SATA RAID Array for Microso - Page 2
Integrated SATA RAID controller This document supplements NVIDIA RAID User's Guide by describing how to set the BIOS to enable SATA hard drives for use in the NVIDIA SATA RAID array. Note: When referring to the NVIDIA RAID User's Guide, please note that the HP xw9300 Workstation does not support the - HP Xw9300 | HP User Manual for the Integrated NVIDIA SATA RAID Array for Microso - Page 3
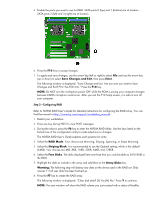
off your computer. Step 2-Configuring RAID Refer to NVIDIA RAID User's Guide for detailed instructions for configuring the RAID array. You can find the manual at http://www.hp.com/support/workstation_manuals. 1. Restart your workstation. 2. Press any key during POST to view POST messages. 3. During - HP Xw9300 | HP User Manual for the Integrated NVIDIA SATA RAID Array for Microso - Page 4
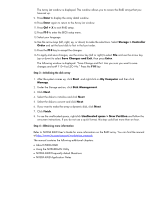
on-screen instructions. If you do not use a quick format, this step could last more than an hour. Step 4-Obtaining more information Refer to NVIDIA RAID User's Guide for more information on the RAID array. You can find the manual at http://www.hp.com/support/workstation_manuals The manual contains - HP Xw9300 | HP User Manual for the Integrated NVIDIA SATA RAID Array for Microso - Page 5
, then press Enter. The following window is displayed: "Save Change and Exit. Are you sure you want to save changes and exit? F10=Yes ESC=No." Press the F10 key. NOTE: Do NOT turn the workstation power OFF while the ROM is saving your computer changes because CMOS corruption could occur. After you - HP Xw9300 | HP User Manual for the Integrated NVIDIA SATA RAID Array for Microso - Page 6
Step 2-Configuring RAID Refer to NVIDIA RAID User's Guide for detailed instructions for configuring the RAID array. You can find the manual at http://www.hp.com/support/workstation_manuals 1. Restart your workstation. 2. Press any key during POST to view POST messages. 3. During the reboot, press - HP Xw9300 | HP User Manual for the Integrated NVIDIA SATA RAID Array for Microso - Page 7
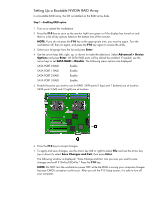
doing a manual OS install and follow the NVIDIA RAID User's Guide instructions for Installing the RAID Drivers when Setting Up a Bootable NVIDIA RAID Array. 15. Initialize the array. When booting from a SATA RAID, the drives are already set up correctly by Windows XP, so no RAID-specific management
-
 1
1 -
 2
2 -
 3
3 -
 4
4 -
 5
5 -
 6
6 -
 7
7
 |
 |
HP User Manual for the Integrated NVIDIA SATA RAID
Array for Microsoft® Windows® XP Professional
Integrated SATA RAID controller
............................................................................................................
2
Setting Up a Non-Bootable NVIDIA RAID Array
...................................................................................
2
Step 1—Enabling RAID option
.......................................................................................................
2
Step 2—Configuring RAID
.............................................................................................................
3
Step 3—Initializing the disk array
...................................................................................................
4
Step 4—Obtaining more information
..............................................................................................
4
Setting Up a Bootable NVIDIA RAID Array
..........................................................................................
5
Step 1—Enabling RAID option
.......................................................................................................
5
Step 2—Configuring RAID
.............................................................................................................
6
Step 3—Verifying boot order
.........................................................................................................
7
Step 4—Obtaining more information
..............................................................................................
7
For more information
............................................................................................................................
7