HP Xw9300 HP User Manual for the Integrated NVIDIA SATA RAID Array for Microso - Page 4
Step 3—Initializing the disk array, Step 4—Obtaining more information, Save Changes and Exit - review
 |
View all HP Xw9300 manuals
Add to My Manuals
Save this manual to your list of manuals |
Page 4 highlights
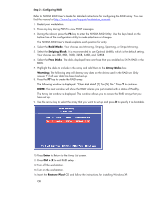
The Array List window is displayed. This window allows you to review the RAID arrays that you have set up. 9. Press Enter to display the array detail window. 10.Press Enter again to return to the Array List window. 11.Press Ctrl + X to exit RAID setup. 12.Press F10 to enter the BIOS setup menu. 13.Select your language. 14.Use the arrow keys (left, right, up, or down) to make the selections. Select Storage > Controller Order and set the boot disk to first in the boot order. 15.Press the F10 key to accept the changes. 16.To apply and save changes, use the arrow key (left or right) to select File and use the arrow key (up or down) to select Save Changes and Exit, then press Enter. The following window is displayed: "Save Change and Exit. Are you sure you want to save changes and exit? F10=Yes ESC=No." Press the F10 key. Step 3-Initializing the disk array 1. After the system comes up, click Start and right-click on My Computer and then click Manage. 2. Under the Storage section, click Disk Management. 3. Click Next. 4. Select the disks to initialize and click Next. 5. Select the disks to convert and click Next. 6. If you want to make the array a dynamic disk, click Next. 7. Click Finish. 8. To use the unallocated space, right-click Unallocated space > New Partition and follow the on-screen instructions. If you do not use a quick format, this step could last more than an hour. Step 4-Obtaining more information Refer to NVIDIA RAID User's Guide for more information on the RAID array. You can find the manual at http://www.hp.com/support/workstation_manuals The manual contains the following additional chapters: • About NVIDIA RAID • Using the NVRAIDMAN Utility • NVIDIA RAID Frequently Asked Questions • NVIDIA RAID Application Notes
-
 1
1 -
 2
2 -
 3
3 -
 4
4 -
 5
5 -
 6
6 -
 7
7
 |
 |
