HP Xw9300 HP User Manual for the Integrated NVIDIA SATA RAID Array for Microso - Page 5
Setting Up a Bootable NVIDIA RAID Array, Step 1—Enabling RAID option, Enter, Advanced > Device
 |
View all HP Xw9300 manuals
Add to My Manuals
Save this manual to your list of manuals |
Page 5 highlights
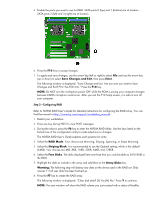
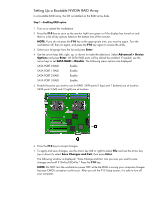
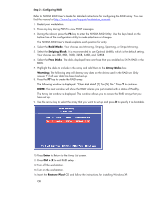
Setting Up a Bootable NVIDIA RAID Array In a bootable RAID array, the OS is installed on the RAID array disks. Step 1-Enabling RAID option 1. Turn on or restart the workstation. 2. Press the F10 key as soon as the monitor light turns green or if the display has turned on and there is a list of key options listed on the bottom line of the monitor. NOTE: If you do not press the F10 key at the appropriate time, you must try again. Turn the workstation off, then on again, and press the F10 key again to access the utility. 3. Select your language from the list and press Enter. 4. Use the arrow keys (left, right, up, or down) to make the selections. Select Advanced > Device Options and press Enter. All SATA RAID ports will by default be enabled. If needed, use the arrow keys to set SATA RAID to Disable. The following menu options are displayed: SATA PORT 0 RAID Enable SATA PORT 1 RAID Enable SATA PORT 2 RAID Enable SATA PORT 3 RAID Enable 5. Enable the ports you want to use for RAID. SATA ports 0 (top) and 1 (bottom) are at location . SATA ports 2 (left) and 3 (right) are at location . 6. Press the F10 key to accept changes. 7. To apply and save changes, use the arrow key (left or right) to select File and use the arrow key (up or down) to select Save Changes and Exit, then press Enter. The following window is displayed: "Save Change and Exit. Are you sure you want to save changes and exit? F10=Yes ESC=No." Press the F10 key. NOTE: Do NOT turn the workstation power OFF while the ROM is saving your computer changes because CMOS corruption could occur. After you exit the F10 Setup screen, it is safe to turn off your computer.
-
 1
1 -
 2
2 -
 3
3 -
 4
4 -
 5
5 -
 6
6 -
 7
7
 |
 |
