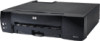
HP e-Printer e20 HP e-printer e20 - (English) Users Guide - Page 8
Connecting the Printer, Installing the Print Cartridges
 |
View all HP e-Printer e20 manuals
Add to My Manuals
Save this manual to your list of manuals |
Page 8 highlights
Connecting the Printer 1. Remove the packing material and tape from the HP e-printer. Installing the Print Cartridges 1. Press the Power button to turn on the printer. 2. Using either a USB cable or a parallel cable, connect the HP e-printer to the set top box. 2. Open the front cover of the printer. The print cartridge cradle moves to the center of the printer. USB cable 3. Carefully remove the vinyl tape from the black print cartridge. Caution! Do not touch the ink nozzles or the copper contacts when you are removing the vinyl tape. Parallel cable 3. Plug the HP e-printer power cord into a wall outlet. 1. Ink nozzles (under vinyl tape) 2. Copper contacts 2 ENGLISH
-
 1
1 -
2
-
 3
3 -
 4
4 -
 5
5 -
 6
6 -
 7
7 -
 8
8 -
 9
9 -
 10
10 -
 11
11 -
 12
12 -
 13
13 -
14
-
15
-
16
-
17
-
18
-
19
-
20
-
21
-
22
-
23
-
24
-
25
-
26
-
27
-
28
 |
 |

2
ENGLISH
Connecting the Printer
1.
Remove the packing material and
tape from the HP e-printer.
2.
Using either a USB cable or a paral-
lel cable, connect the HP e-printer to
the set top box.
USB cable
Parallel cable
3.
Plug the HP e-printer power cord into
a wall outlet.
Installing the Print Cartridges
1.
Press the
Power
button to turn on the
printer.
2.
Open the front cover of the printer.
The print cartridge cradle moves to
the center of the printer.
3.
Carefully remove the vinyl tape from
the black print cartridge.
Caution!
Do not touch
the ink nozzles or
the copper contacts when you are
removing the vinyl tape.
1. Ink nozzles (under vinyl tape)
2. Copper contacts