Hitachi 32PD7800 Owners Guide - Page 17
Mounting the Speaker Unit, INSTALLATION INSTRUCTIONS continued
 |
View all Hitachi 32PD7800 manuals
Add to My Manuals
Save this manual to your list of manuals |
Page 17 highlights
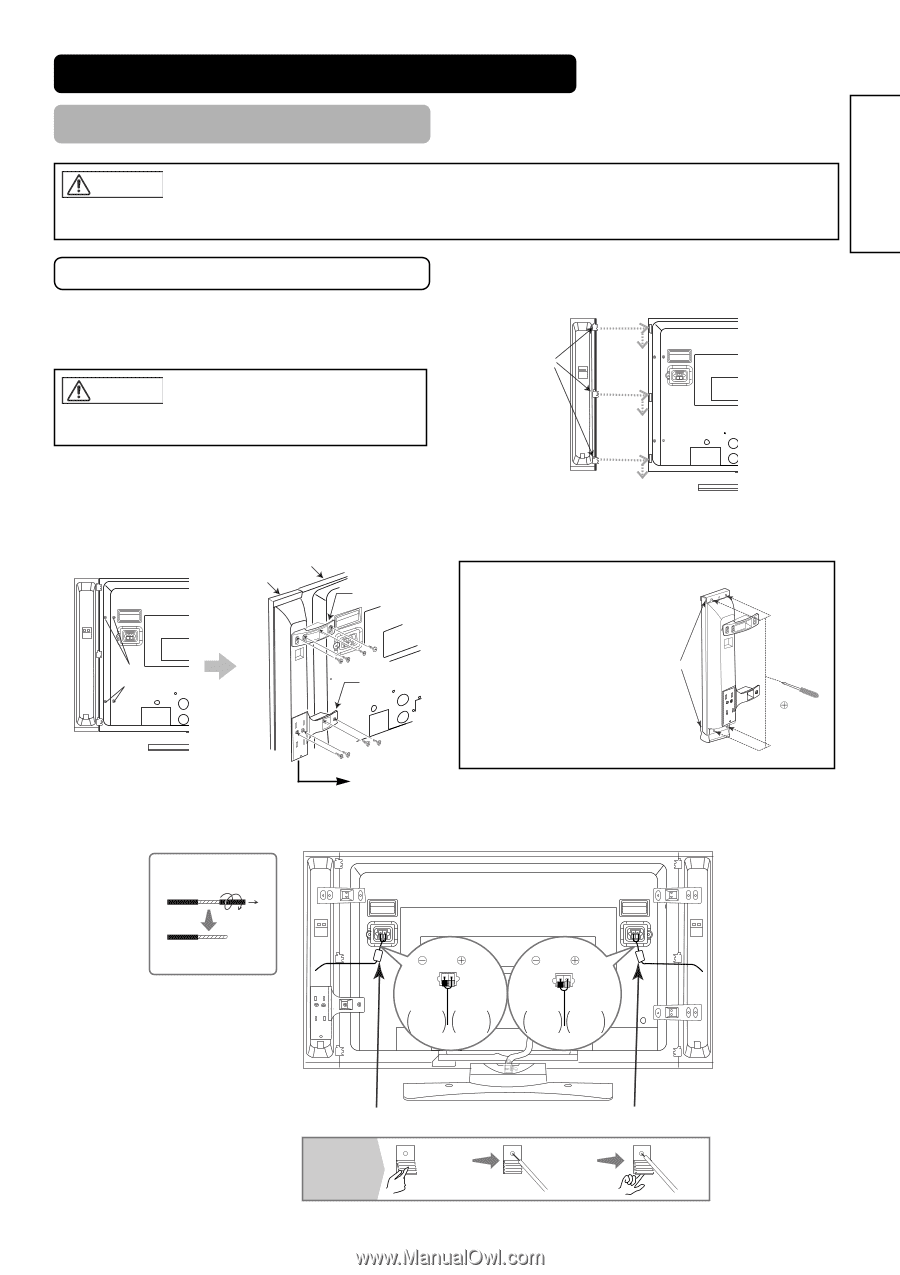
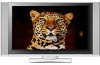
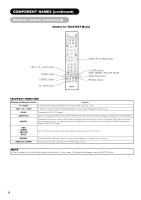
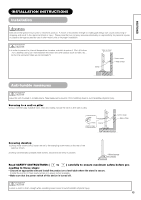
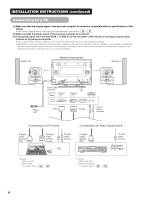
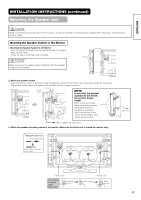
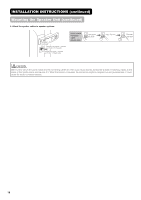
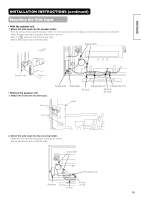
ENGLISH INSTALLATION INSTRUCTIONS (continued) Mounting the Speaker Unit CAUTION Make sure that the main power swich of the monitor is turned off (standby or indicating lamp: off/red) when removing or connecting the speaker cables. Mounting the Speaker System to the Monitor 1. Mounting the Speaker System to the Monitor Hook the clamps (3 pieces) into the holes as shown in the figure, and pull them down. Follow the step in both Right and Left sides. CAUTION Make sure to use the speaker systems fastened with the speaker holders and the screws. Clamps Right Side Rear of the monitor 2. Attach the speaker holders After twisting the screws off as shown, fasten the speaker system to the monitor with the speaker holder by the screws. The speaker holder direction is opposite on the Right and Left speaker systems. Right Side Twist off the screws Rear of the monitor Speaker System Monitor Speaker holder Screws x 4 Speaker holder Screws x 4 NOTE In case that the speaker systems do not fit with the monitor body's height. When loosen the screws fixing the aluminum pieces, Aluminum pieces the speaker system is movable up and down. Adjust the position to the monitor body's height, then tighten up the screws. Place to attach the side input. 3. Attach the speaker connecting cables to the monitor. (Make sure the ferrite core is toward the monitor side) Screwdriver Treating the wire ends Pull off while twisting Please prepare the supplieol speaker cables (R) Black Red (L) Black Red Connect the silver colored wire Connect the copper colored wire Connect the silver colored wire Connect the copper colored wire Ferrite core How to connect the speaker cables (Moniter side) Press down the lever Ferrite core Insert the wire Raise the lever 17
-
 1
1 -
2
-
3
-
4
-
5
-
6
-
7
-
8
-
9
-
10
-
11
-
 12
12 -
 13
13 -
 14
14 -
 15
15 -
 16
16 -
 17
17 -
 18
18 -
 19
19 -
 20
20 -
 21
21 -
 22
22 -
23
-
24
-
25
-
26
-
27
-
28
-
29
-
30
-
31
-
32
-
33
-
34
-
35
-
36
-
37
-
38
-
39
-
40
-
41
-
42
-
43
-
44
-
45
-
46
-
47
-
48
-
49
-
50
-
51
-
52
-
53
-
54
-
55
-
56
-
57
-
58
 |
 |