Hitachi 32PD7800 Owners Guide - Page 37
Operating Instructions Continued, Setup Menu Rgb Mode: Rgb1 Dvi-pc, Rgb2 Rgb
 |
View all Hitachi 32PD7800 manuals
Add to My Manuals
Save this manual to your list of manuals |
Page 37 highlights
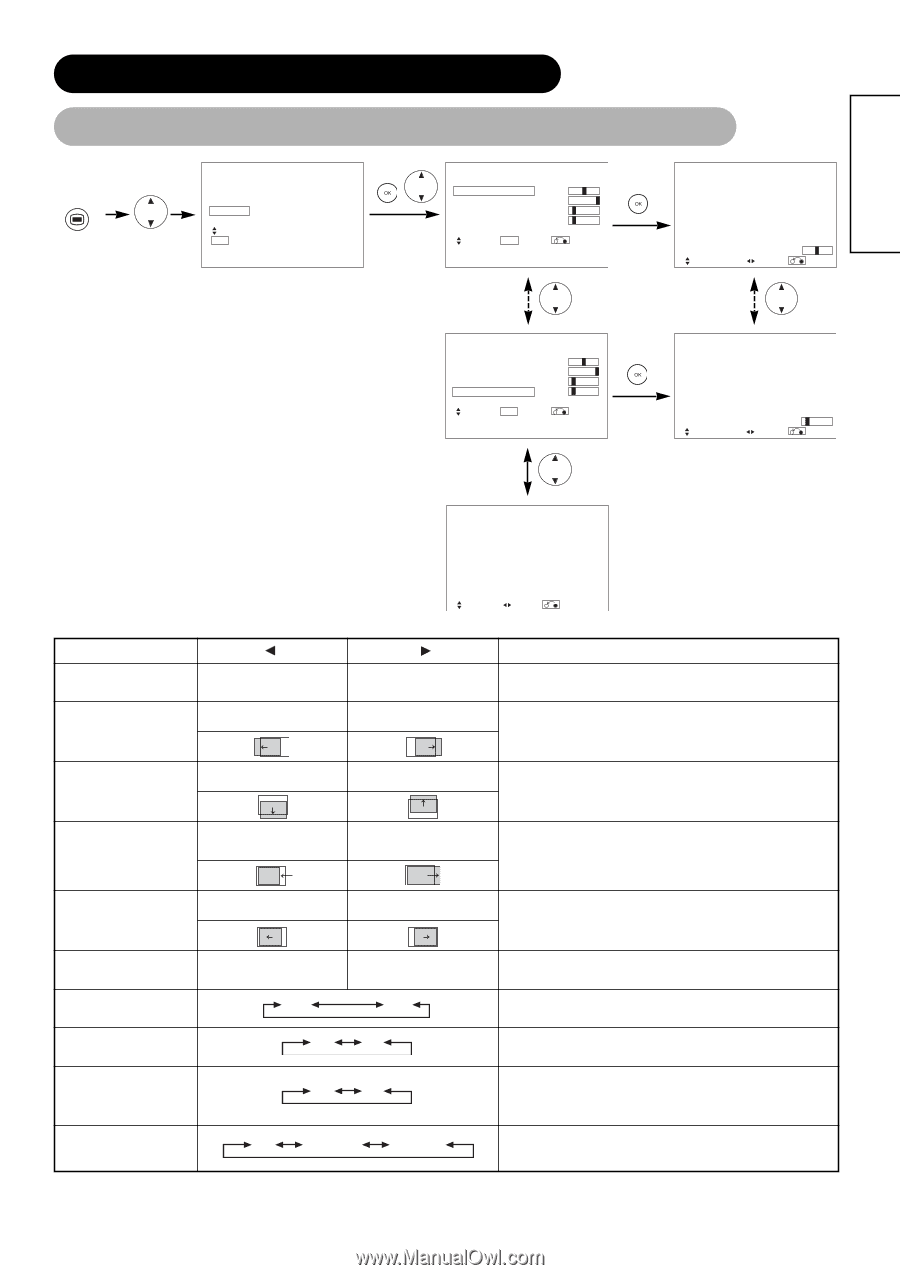
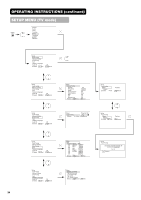
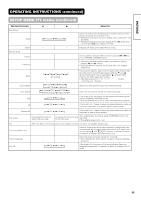
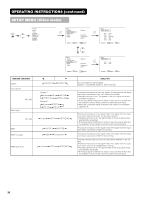
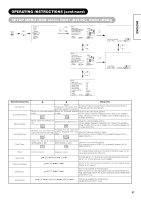
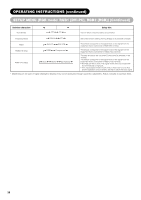
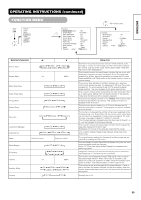
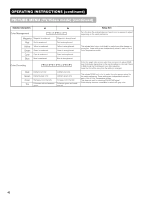
ENGLISH OPERATING INSTRUCTIONS (continued) SETUP MENU (RGB mode: RGB1 (DVI-PC), RGB2 (RGB)) MENU Picture Audio Timer Function Setup Language Select OK Set Setup Auto Adjust Horizontal Position Vertical Position Horizontal Clock Clock Phase Reset Select OK Set Adjust 0 + 31 - 20 10 Reset Return Horizontal Position Next / Prev Adjust 0 Return Setup Auto Adjust Horizontal Position Vertical Position Horizontal Clock Clock Phase Reset Select OK Set Adjust 0 + 31 - 20 10 Reset Return Clock Phase Next / Prev 10 Adjust Return Setup Input Level Frequency Display WVGA Type WXGA Mode Vertical Filter Frequency Mode RGB1 RGB2 Select Set 0.7V Off Off Off On Movie DVI-PC RGB Return Selected characters Auto Adjust* Horizontal Position Vertical Position Horizontal Clock Setup hint - Adjust Pressing the OK button here, Automatic regulation is started. Horizontal Position, Vertical Position, Horizontal Clock and Clock Phase are adjusted automatically. Moves the horizontal position Moves the horizontal position Adjust the left-side display position. to left. to right. Screen display changes to Magenta color if beyond the available range. (This function is only for RGB2. It's not available (grayed out) for RGB1 (DVI-PC).) Moves tion. down the vertical posi- Moves up the vertical position. Adjust the vertical display position. Screen display changes to Magenta color if beyond the available range. (This function is only for RGB2. It's not available (grayed out) for RGB1 (DVI-PC).) Reduces the dot quency (shrinks the clock freright side). Increases the dot quency (expands side). clock frethe right Adjust for maximum character clarity. (This function is only for RGB2. It's not available (grayed out) for RGB1 (DVI-PC).) Clock Phase Slows the dot clock phase Advances the dot clock phase (shifts slightly to left). (shifts slightly to right). Adjust for clear character visibility. (This function is only for RGB2. It's not available (grayed out) for RGB1 (DVI-PC).) Reset Input Level Frequency Display (off the function) (waiting to reset) 0.7V 1.0V Off On WVGA Type Off On WXGA Mode Off 1280x768 1366x768 The original factory settings for the items of this Menu page can be restored by pressing the OK button. Normally set to 0.7 V. If white is found to spread across the screen, set to 1.0 V. (This is effective only for RGB2.) Set this to Off if the frequency information of the Input Signal Screen Display is not required. This is only available for W-VGA signal. When it is set to On, the display area mode can be selected Full or Real. (With RGB1 INPUT, the screen remains the same. RGB2 (ANALOG) INPUT only) This is only available for W-XGA signal. (RGB2 (ANALOG) INPUT only) 37
-
 1
1 -
2
-
3
-
4
-
5
-
6
-
7
-
8
-
9
-
10
-
11
-
12
-
13
-
14
-
15
-
16
-
17
-
18
-
19
-
20
-
21
-
22
-
23
-
24
-
25
-
26
-
27
-
28
-
29
-
30
-
31
-
 32
32 -
 33
33 -
 34
34 -
 35
35 -
 36
36 -
 37
37 -
 38
38 -
 39
39 -
 40
40 -
 41
41 -
 42
42 -
43
-
44
-
45
-
46
-
47
-
48
-
49
-
50
-
51
-
52
-
53
-
54
-
55
-
56
-
57
-
58
 |
 |